Gmail is super convenient in so many ways, but it doesn’t look very professional to use an @gmail.com address for serious applications. So – can you use Gmail with your own domain name? And if so, can you do it for free? The answers to those questions are “yes” and “yes”. And in this post, you’ll learn how to do it.
You can either (a) use a nifty workaround to access your custom email domain from your existing free Gmail account. Or, (b) you can pay for Google’s business tools service, called Workspace. Here’s a breakdown of the two methods:
Key Takeaways
- Method (a) – if you already have email hosting, like from your web host, then you can tell Gmail to fetch email from there at no cost – via SMTP/POP3 settings (even if you’re not familiar with these terms yet).
- Method (b) – for a fee, Google Workspace (formerly G Suite) allows you to set up a dedicated Gmail account with your custom domain name, along with additional features like dedicated Drive storage, custom access to Docs/Sheets, and more.
Let’s get to the detailed how-to on using Gmail with your domain name:
Method (a): How to use Gmail with your own custom domain name for free
In this first method, I’ll show you how to set up Gmail with your custom email for free.
With this method, you’ll be able to link your custom domain name to a regular free Gmail account (e.g. username@gmail.com). Then, you’ll be able to send/receive emails using your custom domain from your regular Gmail account.
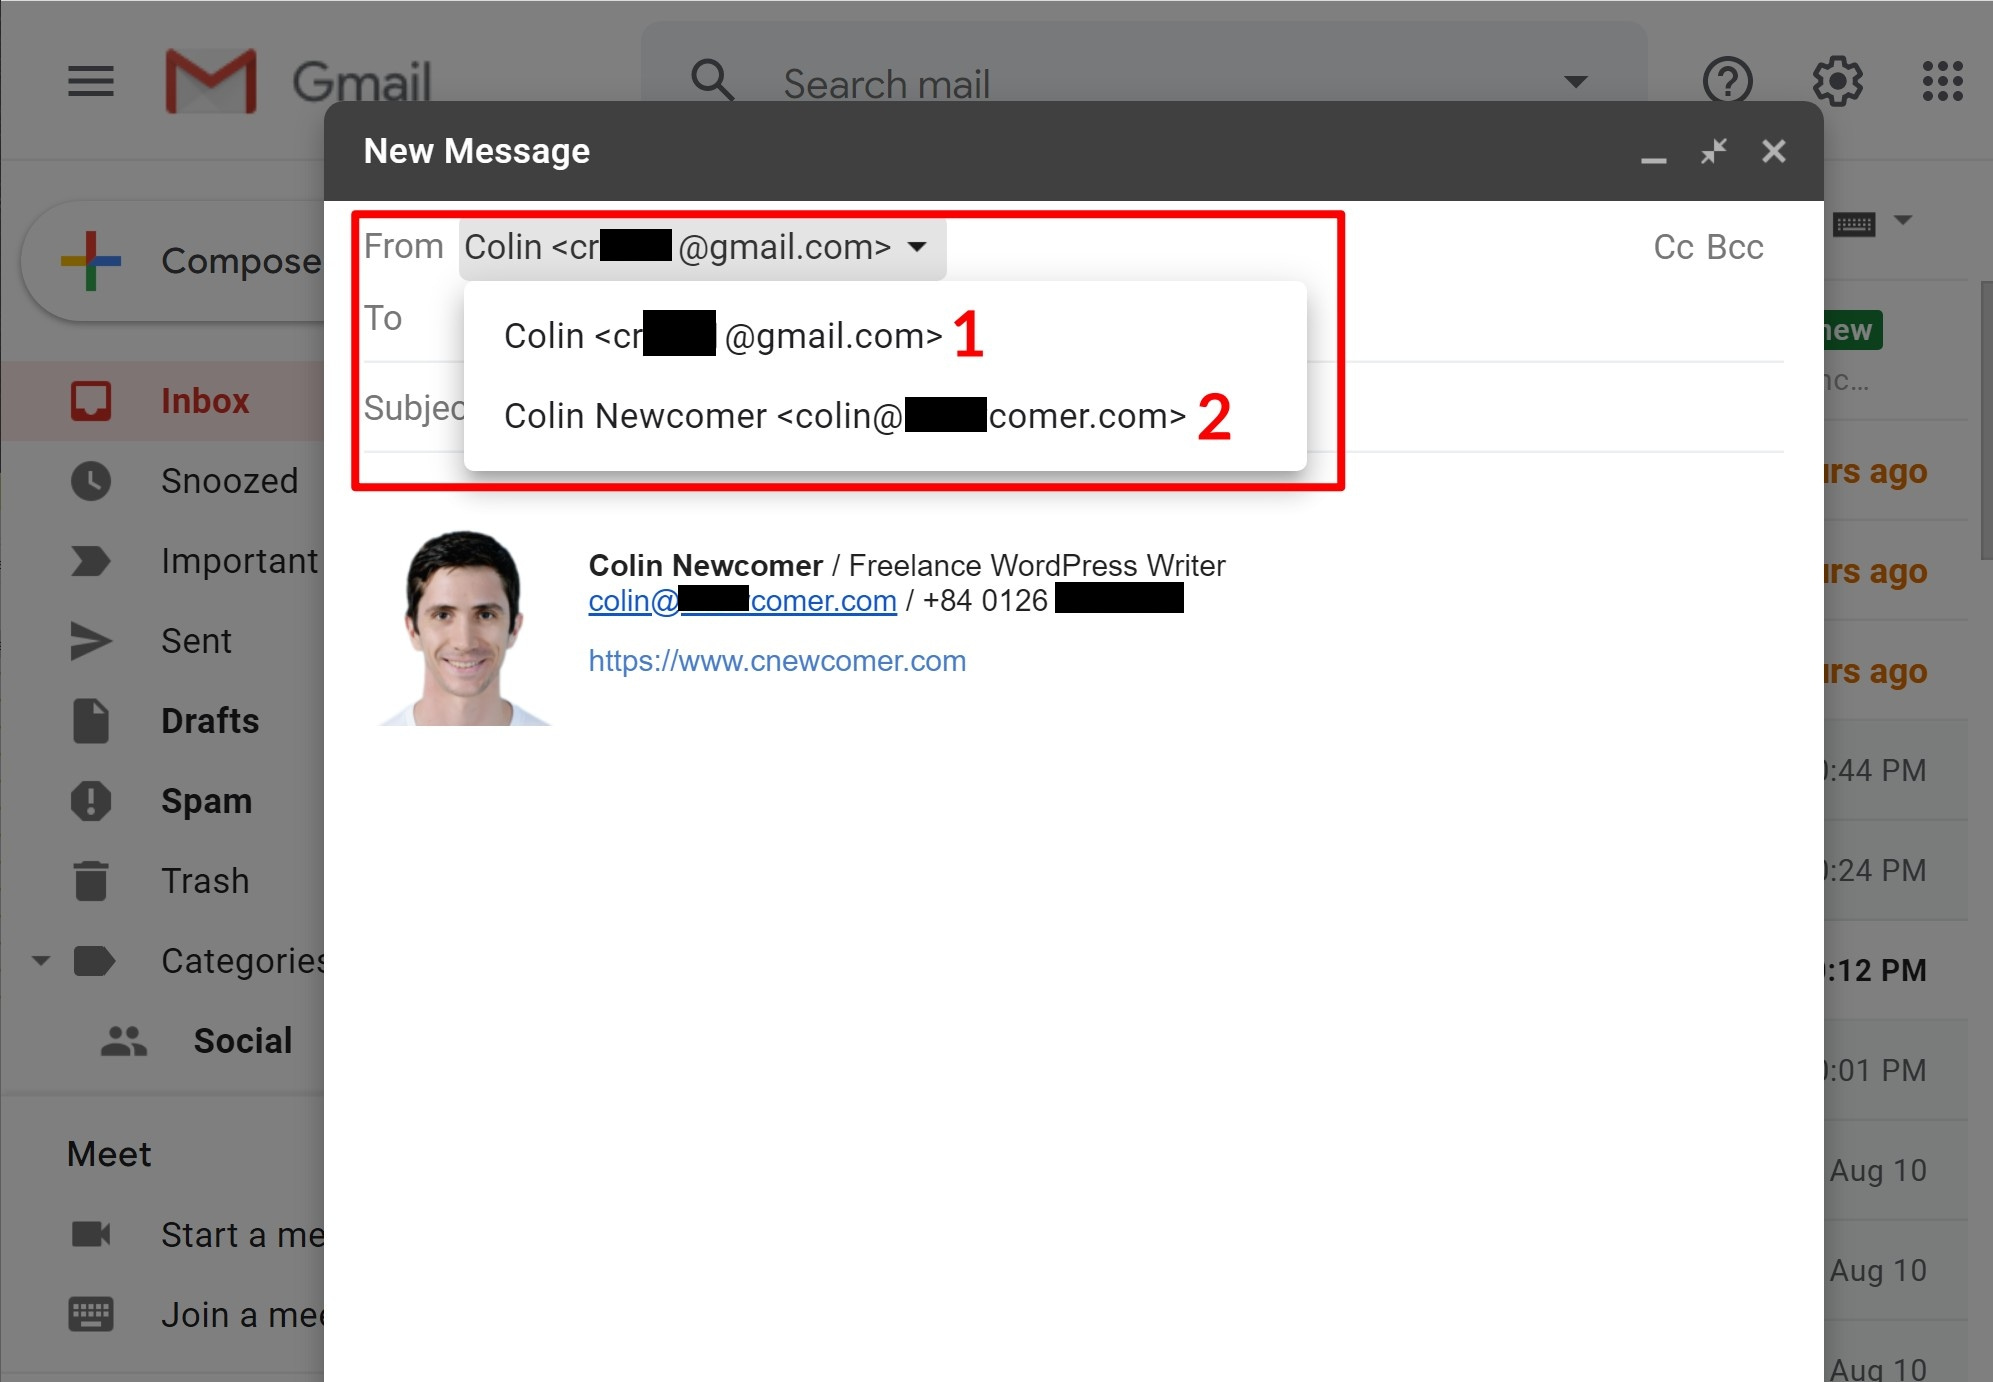
When you compose a new message, you can choose between your free @gmail.com address and your gmail custom domain. If you receive an email at your custom domain, Gmail will automatically respond using that email:
Some important notes about this method
While the Gmail part of this method is 100% free, there are some caveats to this method in that you’ll need to already have email hosting to make it work. Typically, you would get this through your web host if you have a website.
For the rest of this tutorial, we’ll use Bluehost for our example screenshots. However, the same basic principles will apply to any host – the interface will just be a little different. And remember that you also still have the option of signing up for Google Workspace (which we’ll explain right after this) if you don’t want to bother with getting email hosting.
Below are the steps:
- Create a regular free Gmail account
- Create your custom email address via your email hosting
- Allow Gmail to receive emails using POP3
- Allow Gmail to send emails using SMTP
- Test
1. Create a regular free Gmail account
To get started, create a regular free Gmail account – e.g. username@gmail.com. If you already have a Gmail account, you can use your existing account.
However, remember that the emails for your custom domain will be mixed in with any emails to your regular Gmail account, so it might be simpler to create a separate account if you’re already receiving a lot of email at your Gmail address.
2. Create your custom email address via your email hosting
Next, you need to create your custom email address using your email hosting if you haven’t done so already. E.g. you@yoursite.com
If you’re using Bluehost, you can use Bluehost’s email account tool to create your email address from the Email & Office tab:
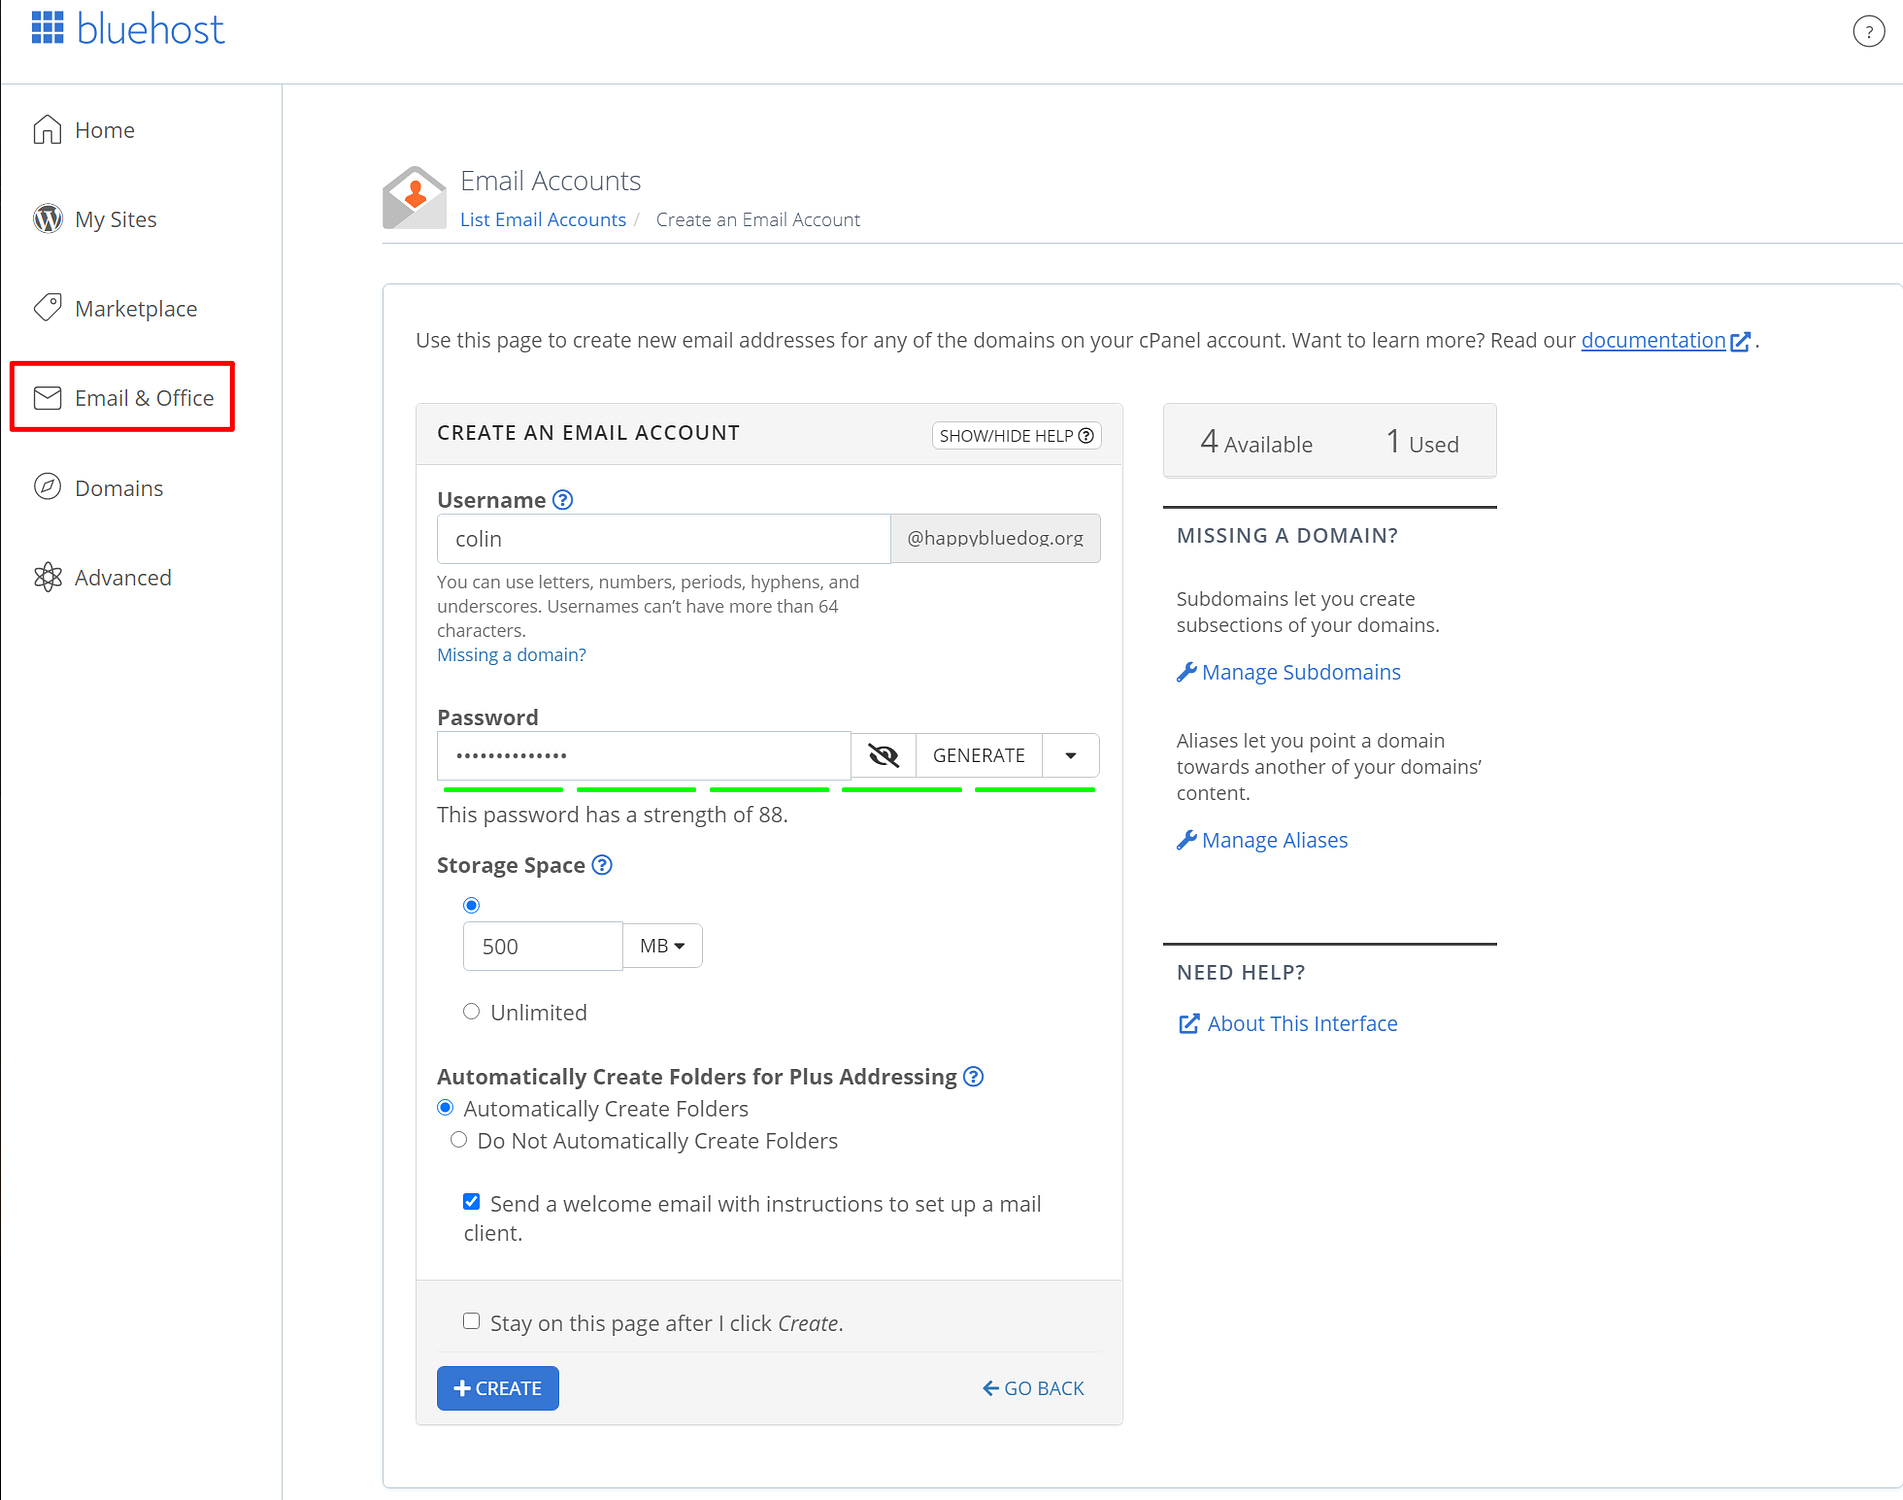
When you create your email account, make sure to remember the password that you choose for your email account.
3. Allow Gmail to receive emails using POP3
Once you have your custom email account, you’re going to use something called POP3 to connect Gmail to your custom email address. Essentially, these settings let your free Gmail account import emails from your email hosting (Bluehost in our example, but it could be different for you).
To get started, you need to find your email’s POP3 settings. At Bluehost, you can do this by clicking the Connect Devices tab when you’re editing your email account. Here’s what it looks like:
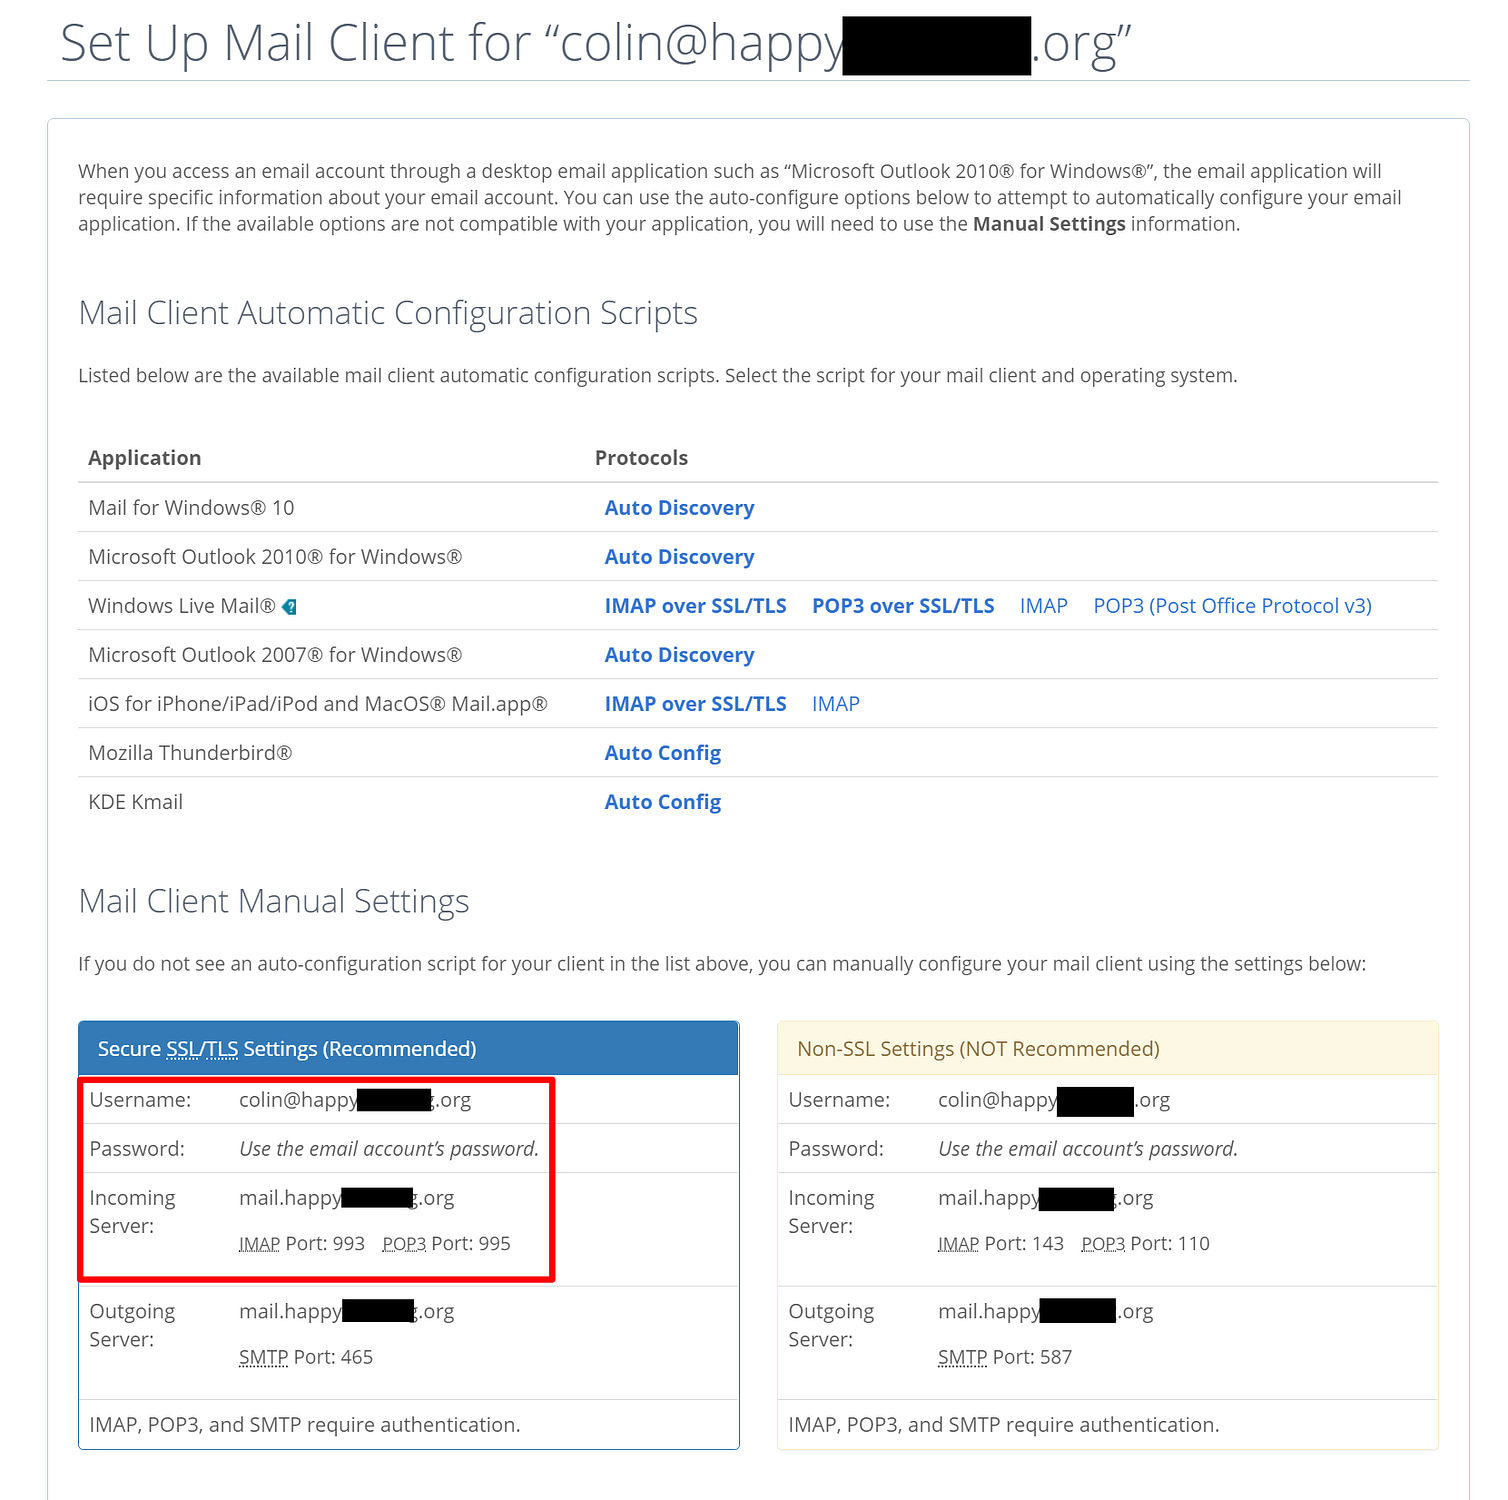
If your email hosting is elsewhere, you’ll want to consult your service’s documentation or reach out to their support if you can’t find your POP3 information.
Then:
- Open the Gmail settings by clicking the gear icon in the top-right corner and selecting See all settings.
- Go to the Accounts and Import tab.
- Find the Check mail from other accounts setting.
- Click Add a mail account.
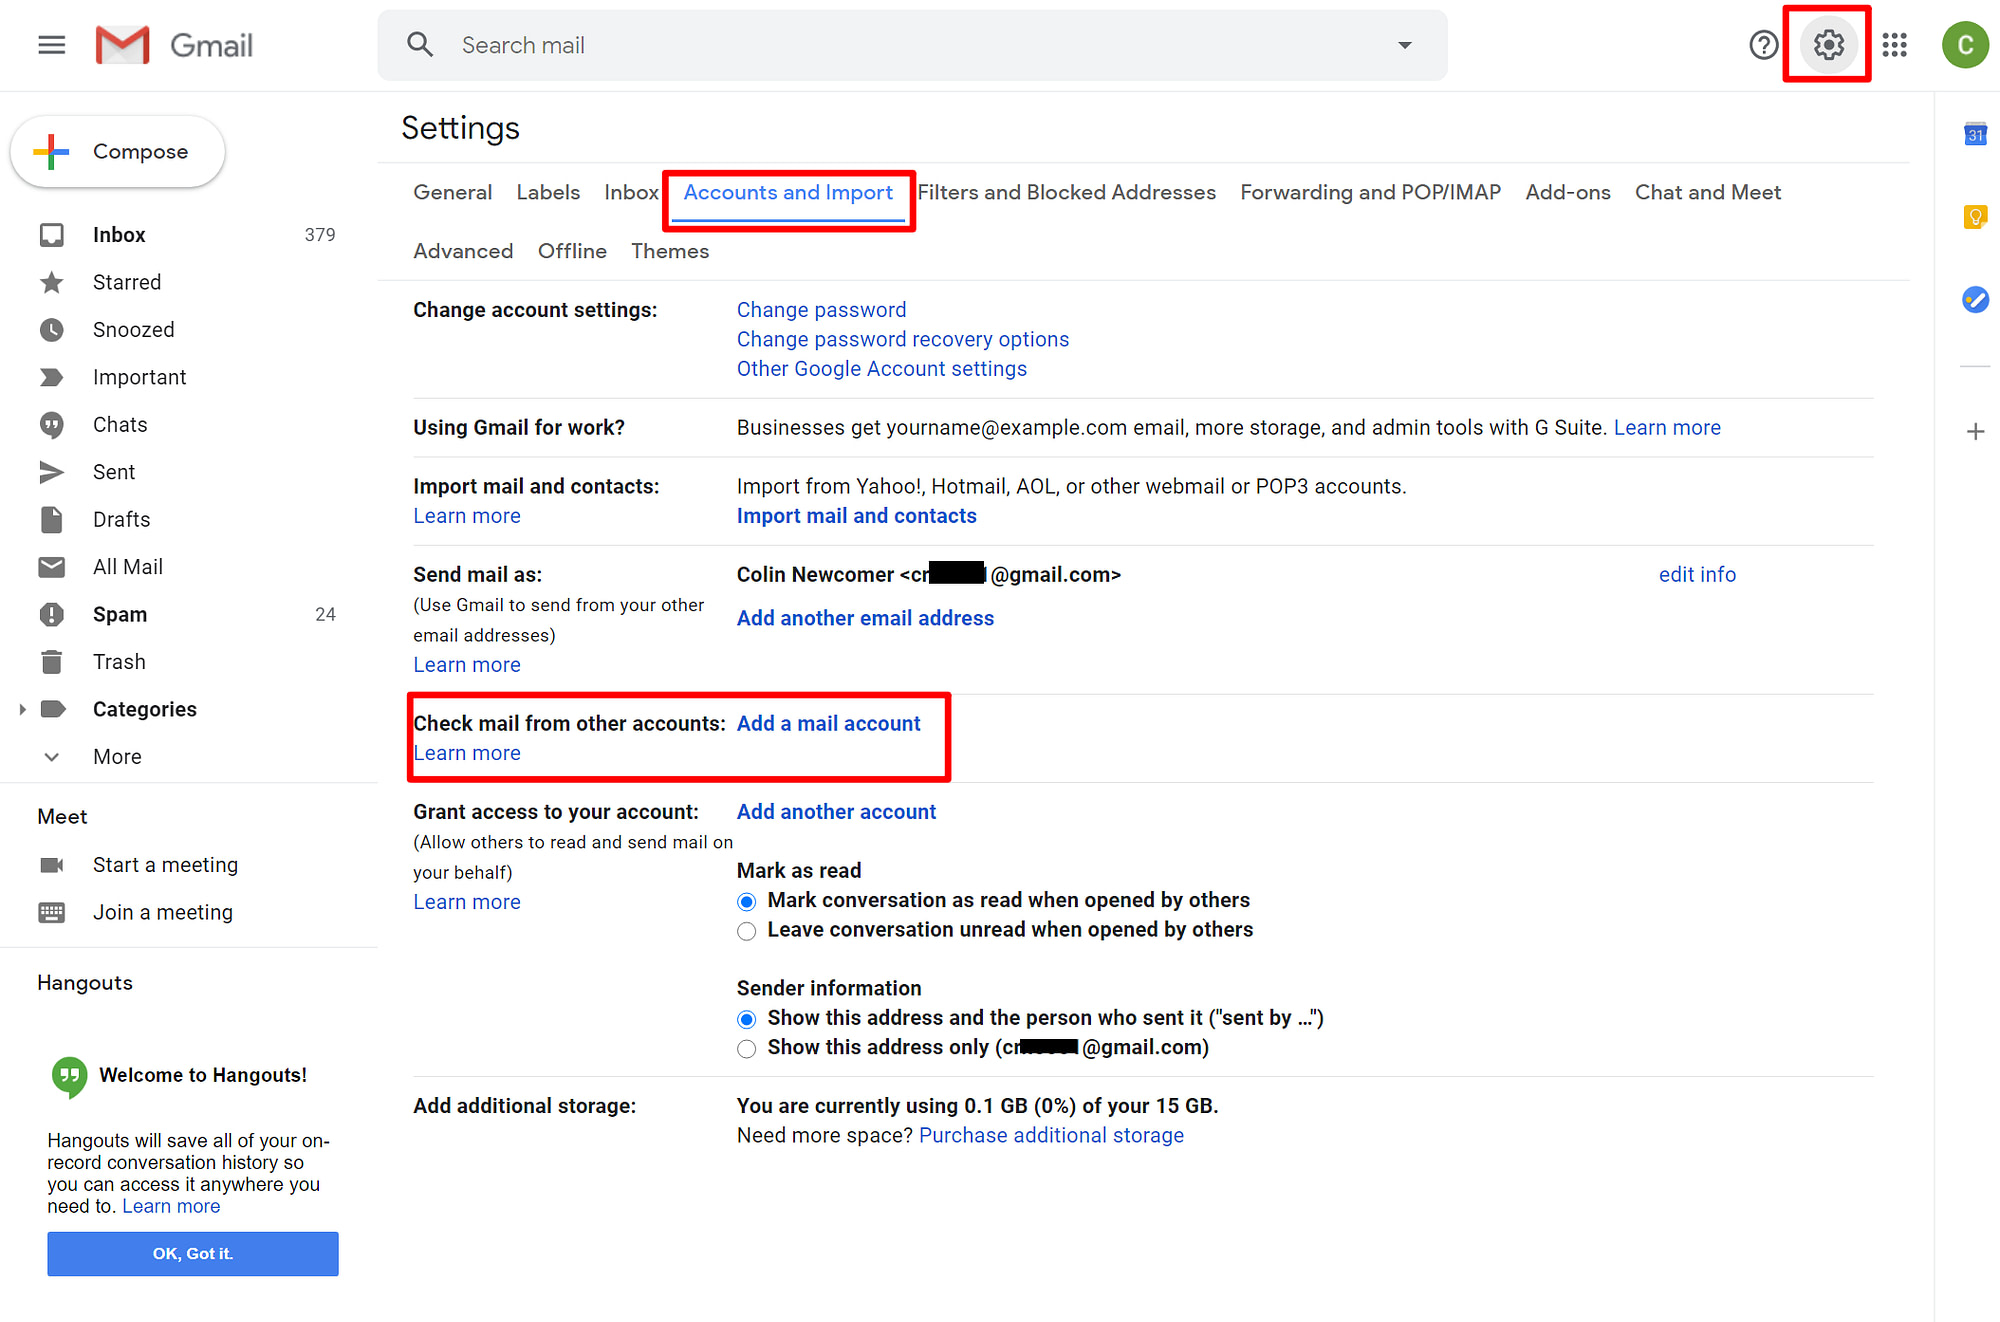
That should open a popup with multiple steps.
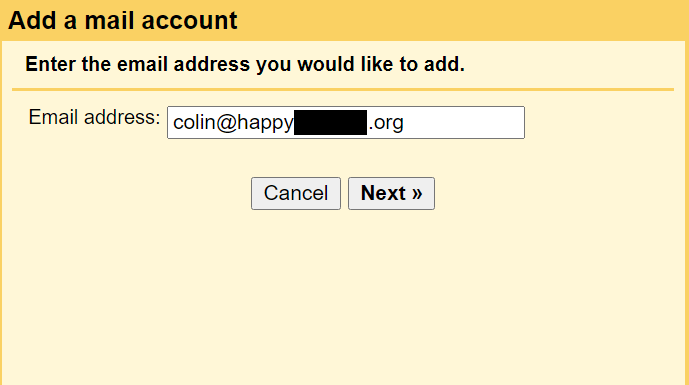
In the first step, enter your custom email address – e.g. you@yoursite.com:
On the next step, choose Import emails from my other account (POP3):

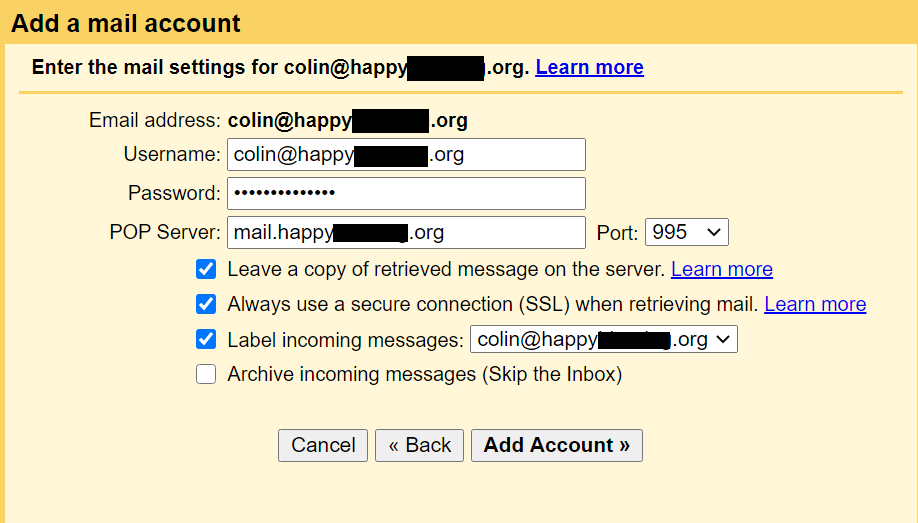
Enter the following information:
- Username – normally, this is your full email address, but sometimes it’s only the part that comes before
@. - Password – the password that you set when creating your custom email address.
- POP Server and Port – from your email host.
- Check the Leave a copy… box.
- Check the Always use a secure connection… box.
- Optionally choose to add a label.
- Click Add Account to finish the process.
4. Allow Gmail to send emails using SMTP
At this point, new emails to your custom domain should show up in your Gmail account. However, you won’t be able to reply to them from your custom email domain yet.
To fix that, you need to configure your Gmail account to send through your custom email’s SMTP server. Typically, you’ll find your email’s SMTP server information at the same spot where you found the POP3 information:
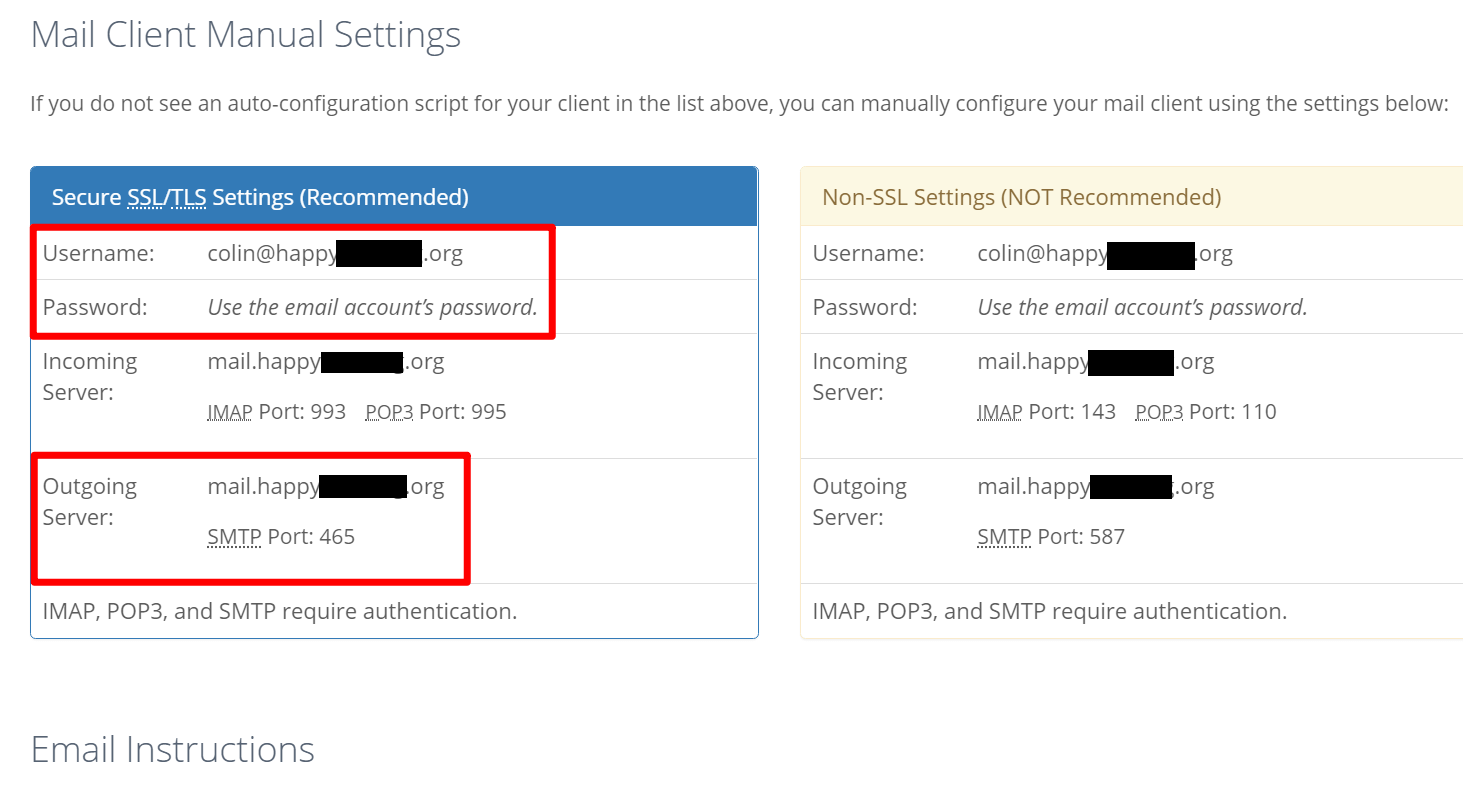
Once you have your SMTP information:
- Go back to the Accounts and Import area in your Gmail account’s settings.
- Find the Send mail as setting.
- Click Add another email.
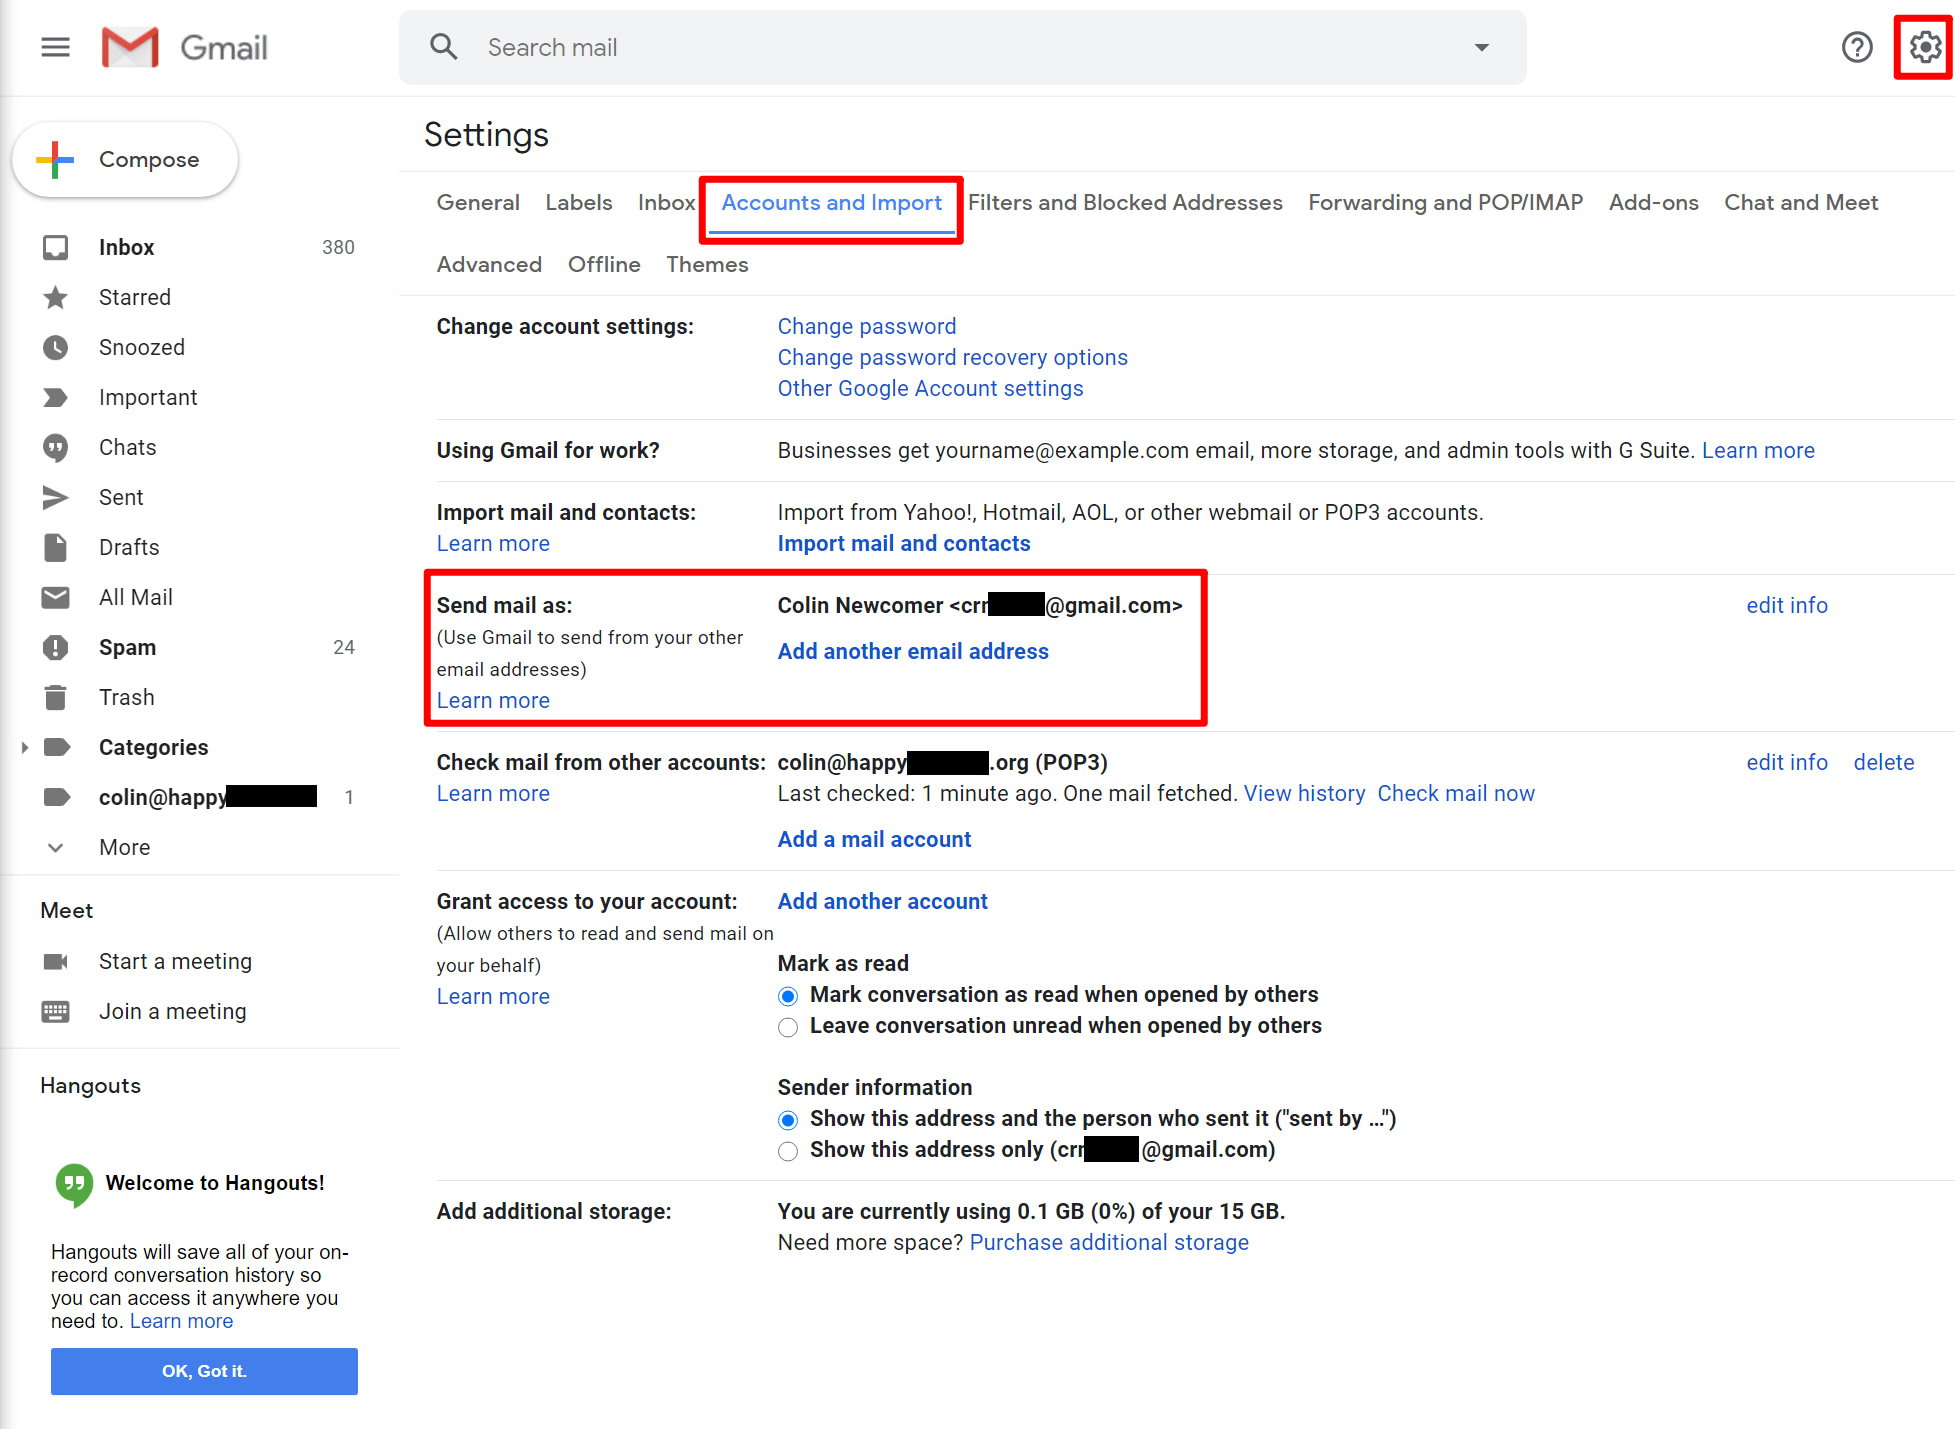
This will open another popup window that has multiple steps.
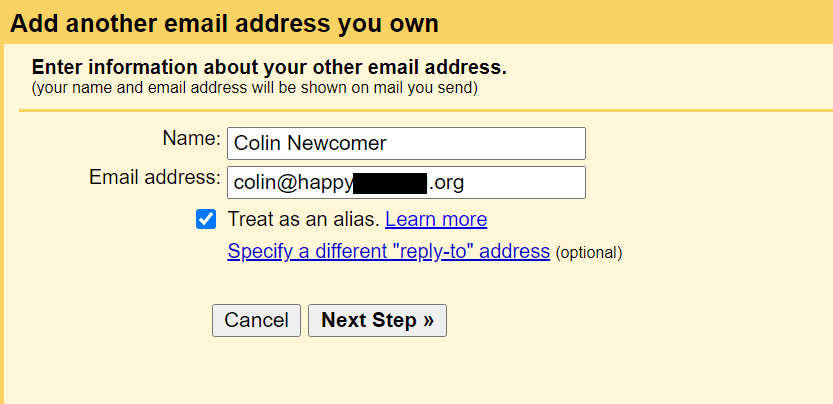
On the first screen:
- Enter your name.
- Enter the custom email address that you’re using.
- Check the box for Treat as an alias.
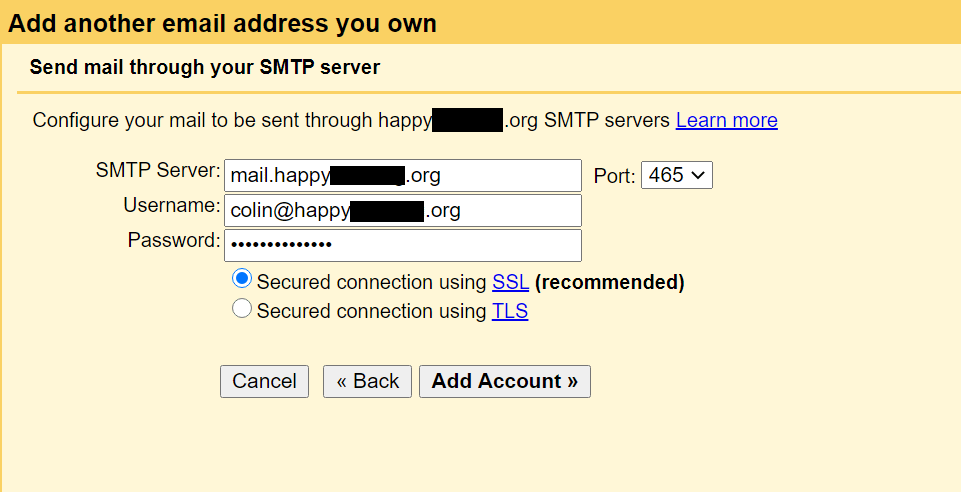
Next, enter the SMTP information from your email host:
- SMTP Server and Port – from your email host.
- Username – normally, this is your full email address, but sometimes it’s only the part that comes before
@. - Password – the password that you set when creating your custom email address.
- Choose whichever Secured connection method that Gmail recommends.
- Click Add Account.
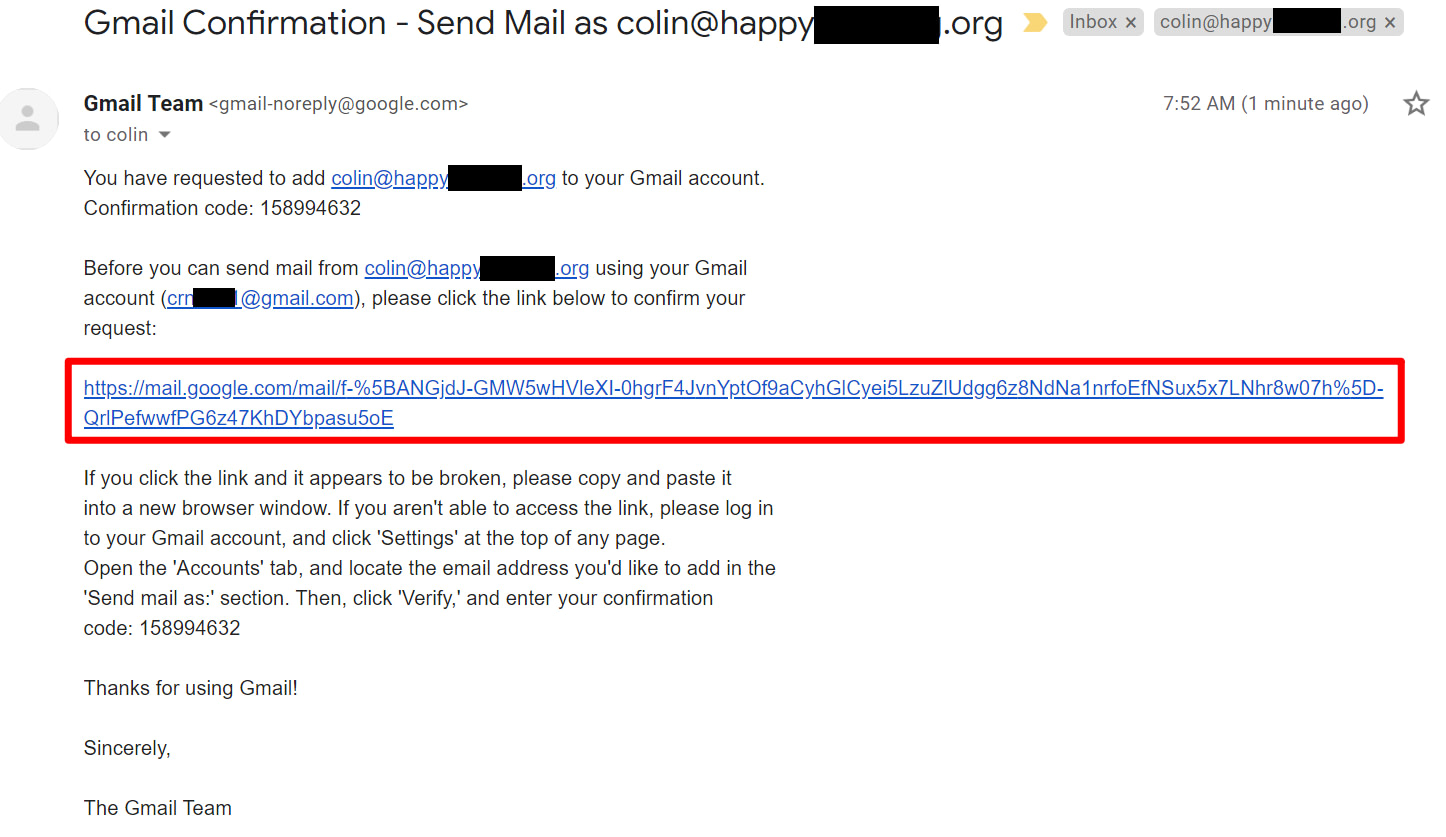
Gmail will then send a confirmation code to your custom email address. You need to click the link in that email and click Confirm to finish the process.
Since you already configured Gmail to receive emails from your custom domain name, you should be able to receive this email from your Gmail account. It might take a few minutes for Gmail to fetch the email from your server.
5. Test!
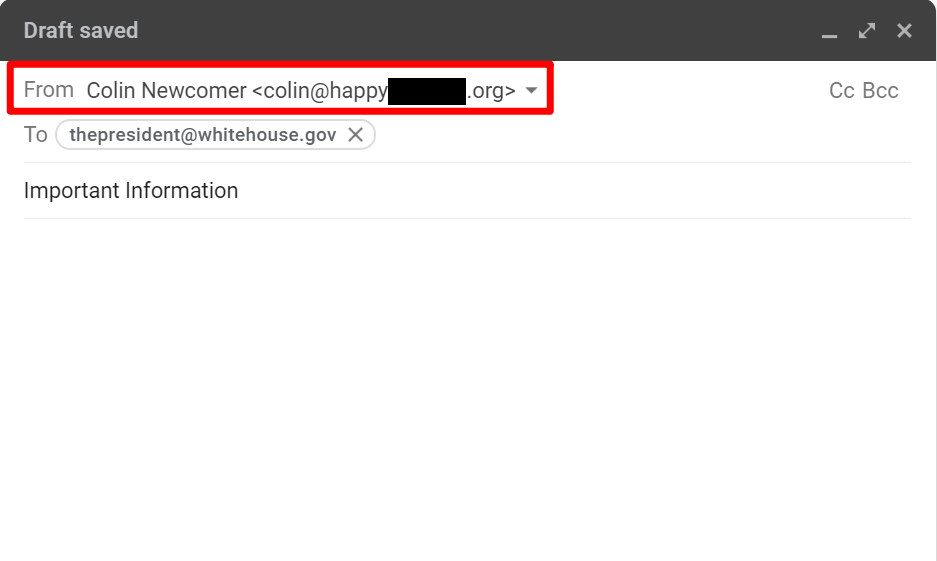
At this point, you should be ready to rock. You can send and receive some test emails to make sure it’s working.
When you compose a new email in Gmail, you should be able to choose which email to send from above the To line:
If everything works, you’re all done!
Method (b): How to use Gmail with your own domain name by paying for Google Workspace (G Suite)
If you’re willing to pay, another way to use Gmail with your own domain name is to pay for Google’s Workspace service, formerly called G Suite.
Google Workspace essentially lets you create an entire Google account with your own custom email, instead of using a Gmail address. This not only gives you access to Gmail with your own domain name, but it also gives you separate access to other Google tools such as:
- Drive
- Docs
- Sheets
- Meet
- Calendar
- Etc.
If you have an organization, you can also set up Google Workspace (G Suite) for your entire organization so that you can all easily share files with one another.
There’s a lot to like about this method. However, the downside is obviously that it isn’t free!
There are two ways to go with Google Workspace:
- Business plans – these plans let you pay per user and start at $6 per month per user. So if it’s just you, you’ll pay just $6 per month. However, if your business has five employees, you would pay $30 per month (5x$6 per month).
- Individual plan – this plan is tailored to individuals who won’t need to add other team members. However, it’s a little more expensive at $9.99 per month.
If you want to save money, using the Business plans is the best option (even if you’re an individual). However, because the Business plans are tailored towards teams, it’s a little more complicated to set things up.
If you’re willing to pay a slight premium for simplicity and you know that you won’t need to ever add more team members, it’s totally fine to go with the Individual plan.
Below, we’ll share a brief tutorial on how to set this up using the Business plans. However, if you’re interested in this method, we actually have an entire guide on how to set up Google Workspace (G Suite). Otherwise, here are the steps:
- Create a Google Workspace account and follow the wizard
- Verify your domain name with Google Workspace (G Suite)
- Add MX records for email
1. Create a Google Workspace account and follow the wizard
To get started, 👉 go to the Google Workspace website.
Follow the account setup wizard to configure the basic details, like which custom domain you want to use with Google Workspace. This will be the domain name at the end of your email address – e.g. @yoursite.com:
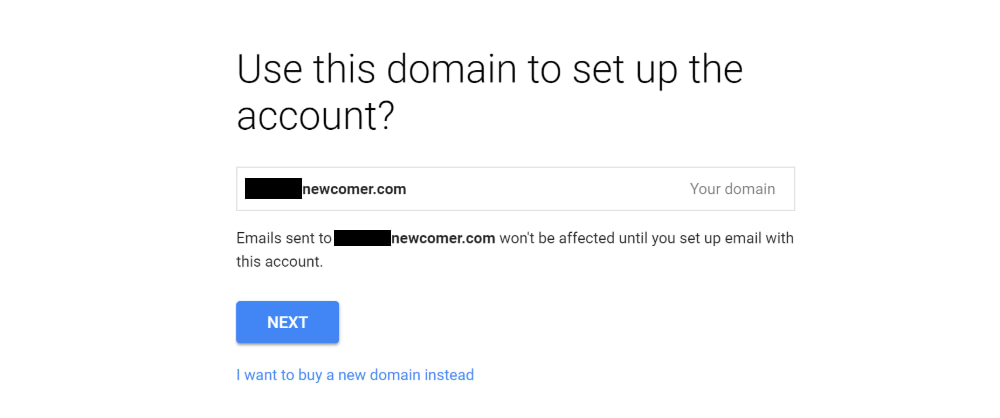
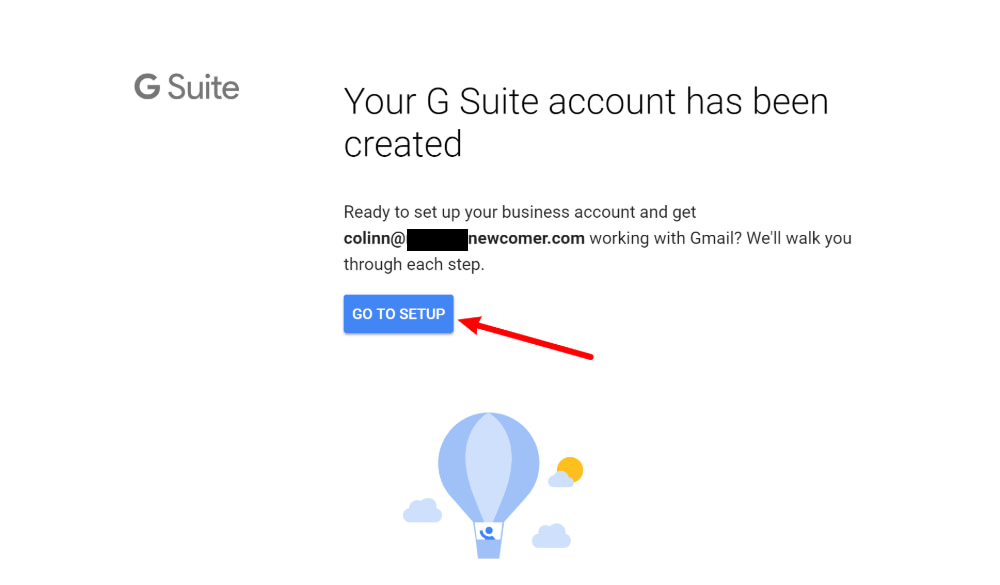
If you’re the only person who will be using Google Workspace (G Suite), you’re finished once you complete the wizard. If you want to give other people custom email addresses, you can also do that after completing the initial setup wizard:
2. Verify your domain name with Google Workspace (G Suite)
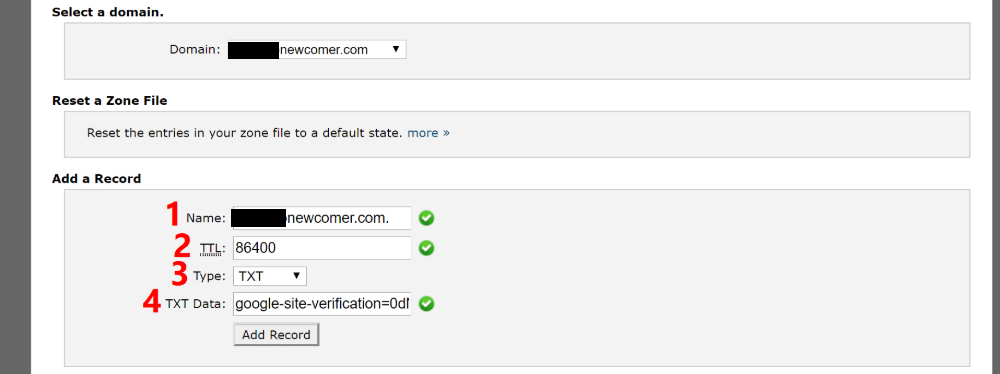
Next, you’ll need to verify your domain name with Google Workspace (G Suite) by adding something called a TXT record. Depending on how you have things configured, you can do this at either:
- Your web host (if you pointed your domain name to your host’s nameservers)
- The place where you registered your domain name
Google Workspace (G Suite) will provide detailed instructions for most popular hosts/registrars.
Here’s what it looks like to add the TXT record using cPanel (via my SiteGround hosting account):
3. Add MX records for email
Once you’ve verified your domain name, you also need to add another type of record called MX records so that Google Workspace (G Suite) can manage the email for your domain name.
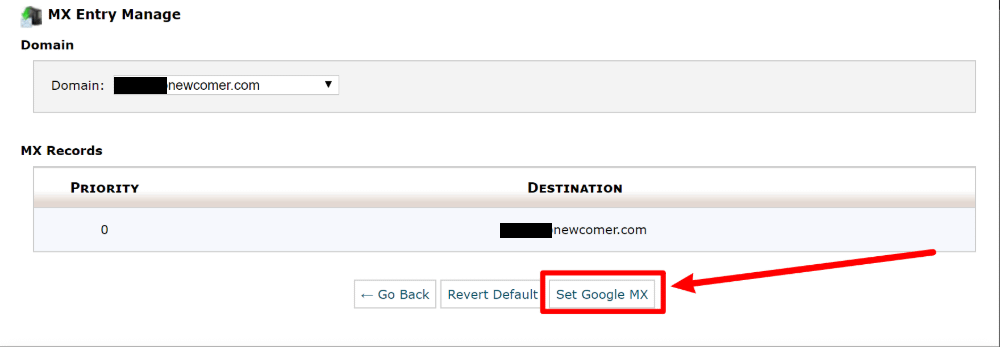
You can do this via the same interface where you added the TXT record. Or, many web hosts include a built-in tool to help you add the Google Workspace (G Suite) MX records.
For example, with the cPanel dashboard at SiteGround, you get a dedicated Set Google MX tool in the MX Entry interface:
And that’s it! You should be ready to use Gmail with your custom domain name.
Remember – if you want a more detailed look, check out our full Google Workspace (G Suite) tutorial.
Conclusion: methods (a) and (b) summarized
With the methods (a) and (b) from this post, you can use Gmail with your own domain name and thus get the convenience of Gmail with the professionalism and brandability of a custom email address.
Let’s recap:
Alternatively, you might want to sign up with a third-party web host like Bluehost and get a bundled offer of website hosting + email hosting + domain name for $2.75 per month.
If you want to see some other options beyond Gmail, you can also check out our guide on how to create a business email address.
As outlined above, there are two main methods: Method (a) is a cost-free option where, if you already have email hosting (such as from your web host), you can configure Gmail to fetch emails from there using SMTP/POP3. Method (b) involves a fee for using Google Workspace. This service allows you to set up a dedicated Gmail account with your custom domain.
Google Workspace is a collection of cloud-based tools and services provided by Google, aimed at helping individuals and organizations work more efficiently. It includes popular applications like Gmail for email, Google Drive for online storage, Google Docs and Sheets for document creation and collaboration, and Google Meet for video conferencing. Learn more about what Google Workspace is here.
The prices start from $6.00 / month. For that, you get access to a Gmail business email, Google Meet video and voice conference with up to 100 participants, 30GB pooled storage per user – stored and organized in Google Drive, and much more. Here’s the complete list of features and perks.
Yes, using the method (a) outlined above, you can connect more than one email account to your Gmail. You can do that with method (b) as well.
To set up Gmail with a custom domain using Google Workspace, first register an account and follow the setup wizard. Optionally, add other users to your account. Then, verify your domain ownership by adding a TXT record to your DNS settings. Finally, set up your email service by adding MX records to your DNS, which directs your domain’s email traffic to Gmail servers. To learn the exact steps, read this guide of ours.
You can connect any type of email hosting with a Gmail account if you’re going with method (a). Of course, the exact steps might be different depending on the host you’re using, but the general steps are similar. We like to do this with Bluehost. It’s a reliable host, has all the features and you can get it starting from $2.75 / month.
Still have any questions about how to use Gmail with your own domain name? Ask us in the comments!












So if I understand this correctly, you’re still using your existing mail server, but you’re just using gmail (instead of say, outlook) as your access point. (?) The reason I was looking into this is because my host uses a 3rd party spam filter that just flat out blocks “suspicious” e-mails (there is a “junk” folder, but it’s always empty because of the e-mails being blocked.) They told me there’s no way to change this, and I was wanting something more g-mail-like wherein I could decide/mark something as spam or not spam for myself. But if this method is just pulling from my host’s server, well the blocked e-mails are already blocked, right?
Hi Colin, In Feb. 2024, Mailchimp changed the connection with Gmail. I have a paid Google Workspace using my domain name with my email. I have a GoDaddy domain host. Now, I’m having trouble authenticating my domain name to use my Gmail. Any ideas to solve this? Thanks
Hi Donna,
Since you are using an email with your own domain name, there should be no issues authenticating your domain with Mailchimp.
The first thing to check is to make sure that your domain is verified with Mailchimp. This is a prerequisite to being able to authenticate your domain. If you have not verified your domain, you should do that before trying to authenticate your domain.
If your domain is verified, try restarting the domain authentication process on Mailchimp and choose to authenticate your domain manually. You will then be able to select GoDaddy as your domain provider and you’ll be guided through the steps on how to add a new CNAME and TXT record. Double-check that you entered the records correctly.
This is all you need to do to authenticate your sending domain.
Let us know if this worked.
Does this work with imap? And what if I have more than one custom domain? Do I need a workspace account for each one?
You don’t need 2 Workspace accounts. On one Account you can add more domains.
For IMAP part, you can check out here: https://developers.google.com/gmail/imap/imap-smtp
How to do the payment. Its not mentioned here in this page. Please let us know.
Or start the conversation in our Facebook group for WordPress professionals. Find answers, share tips, and get help from other WordPress experts. Join now (it’s free)!