

If you’re looking to change the order of your posts in WordPress, whether to highlight your best content or simply to keep your site fresh and engaging, you’ve come to the right spot.
Today, I’ll guide you through three key scenarios where reordering posts can significantly enhance your website’s appeal. From tweaking settings to using plugins and a touch of “sticky” posts, we’ll cover each method step-by-step, ensuring that even those new to WordPress can follow along with ease.
Let’s dive in and discover how easy it is to customize your site’s presentation to match your vision.
📚 Table of contents:
- How WordPress orders posts by default (and why it can be a problem)
- Beginner-friendly ways to reorder posts in WordPress
- Conclusion
How WordPress orders posts by default (and why it can be a problem)
Before we show you how to reorder posts in WordPress, let’s briefly talk about how the platform handles this by default. As with most default settings in WordPress, blog post ordering is straightforward.
Your blog posts will be displayed in reverse chronological order. This will appear different depending on your site’s theme and layout, but it might look something like this:

Meanwhile, on the back end, you’ll see a list of your blogs in table form:

On this screen, you may notice the options to view your posts based on Title and Date. However, if you use this feature, the changes won’t be reflected on the front end.
It’s also important to note that if you have a recent posts widget in your sidebar area (or somewhere else on your site), this reverse chronological ordering will also be reflected there.
Now, let’s talk about why this default ordering system can be a problem. The main issue is that it’s not customized in any way. Unless you’re extremely strategic about the order in which you publish posts, your archives can come across as random.
Displaying posts based on importance or relevance can be much more useful. For example, let’s say that some of your older posts are highly successful. You might want these to be displayed at the top of your blog page, so new readers can see your best content right away. Alternatively, if you’re publishing a series of related posts, you might want to present them in a traditional chronological fashion.
Beginner-friendly ways to reorder posts in WordPress
Now that you know how WordPress orders posts by default, we’re going to show you three simple ways to reorder them. This way, you can customize how your articles appear on your website.
Option 1: Change post dates manually
Since WordPress posts are displayed in reverse chronological order, you can reorder them by simply changing their dates. For instance, if you want your oldest post to appear as the latest article in your feed, you can change its publication date to the current day.
The quickest way to do this is to go to the Posts page in your WordPress dashboard and find the post that you’d like to move. Hover over it and click on Quick Edit:

Then make your modifications and click on Update:

Alternatively, you can open the post in the Block Editor and make the same change in your Post settings:

Just find the Summary panel and click on the date next to Publish. This will open your calendar and enable you to select a date:

Once again, you’ll need to hit Update when you’re finished.
Although this method is simple, it may not be ideal for a few reasons. First of all, you might not want to mislead your readers about the true publication dates.
Furthermore, modifying the publication date of a timely post can change the apparent ‘freshness’ of your perspective or content. This is especially true if your blog is centered around pop culture or news. In these cases, you may want to check out one of the following methods.
Option 2: Use the Post Types Order plugin
As you may already know, you can extend WordPress in many ways using plugins. There’s even a free tool that lets you reorder posts, called Post Types Order:
To get started, install and activate the plugin. Then you should see a notification at the top of your dashboard prompting you to go to the settings page.
If not, you can simply go to Settings → Post Types Order to configure this tool. Here’s what the General settings will look like:

As you can see, you’ll be able to decide which elements of the reordering interface are visible. You can also choose which WordPress user roles will be able to see these ordering features.
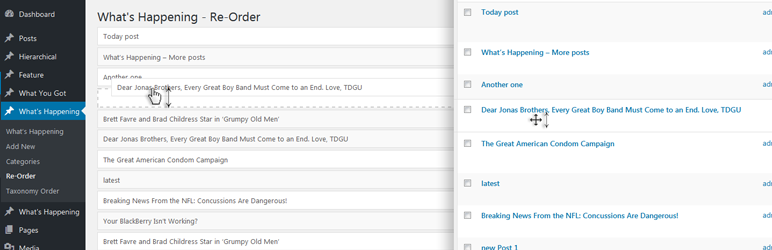
However, if you want, you can keep all the default settings and simply go to Posts → Reorder:

On this page, you can easily drag and drop your blog posts to reorder them.
If you want to be able to reorder posts in WordPress on the regular Posts screen, you’ll need to return to your plugin settings. Scroll down to the Archive Drag&Drop section:

Select Yes in the drop-down menu next to Post. If you prefer, you can also enable this feature for pages, media, patterns, and navigation menus.
When you’re happy with your selections, click on Save Settings. Then you’ll be able to reorder your articles without leaving the Posts section:

It’s as simple as that!
Plus, one nice thing about this plugin is that it allows you to keep the same publication dates for your posts. This way, you can properly preserve your posts’ historical relevance.
Option 3: Create sticky WordPress posts
If you want to make sure your readers don’t miss a certain blog post, making it ‘sticky’ is a useful option. This is also commonly done with navigation menus and is similar to ‘pinning’ a post to the top of a social media profile. It’s handy if you want to highlight one or a few articles without having to reorder your entire back catalog.
With WordPress, this can be done in one easy step. Simply navigate to your Posts screen, find the blog post you want to make sticky, and open it in the Block Editor. Then go to your Post settings and find the Summary section:

Below the post’s URL, you should see a checkbox labeled “Stick to the top of the blog.”
All you have to do is check the box and hit Update. Keep in mind that how the result appears on the front end of your website will depend on your WordPress theme.
You can also access this feature via your Quick Edit options:

There, you can check the box to “Make this post sticky” and then select Update.
It’s also important to note that if you make multiple posts sticky, they will all be bumped to the top of your blog feed. However, these sticky posts will then be organized in reverse chronological order once again.
Conclusion
As your WordPress blog archive grows, ordering posts in reverse chronological order (which is the default setting) can become less than ideal. You might want to highlight certain articles, and some of your older posts may still be relevant if you produce evergreen content.
Fortunately, there are a few simple methods to reorder posts in WordPress. You can take the manual approach and just change the publication dates for posts you want to appear higher on the list. Alternately, you can use a plugin like Post Types Order to access advanced sorting features. Finally, you can make specific articles you’d like to highlight ‘sticky.’
Do you have any questions about how to reorder posts in WordPress? Let us know in the comments section below!


In my posts, I have 16 pages, each page contains 20 posts, how do i move a post from lets say page 2 to the first spot on page 1? It will only let me drag a post on the current page. Thanks!
Option 2 doesn´t works to me.
The code sample is incorrect. Change all “$query-” to “$query->” instead.
I have two different kinds of posts: newsletters and Case Studies. Some of the Case Studies are mixed in with the newsletters in their order of publication. How can I separate the two and keep the newsletters and Case Studies each in their respective order?
what about pages?
Will option 1, changing the date manually also change the original URL? I have my blogs sorted by URL in the WordPress permalink structure and do not want to change the date in which it originally posted as that will break and 401 all backlinks. Thanks Russ
If you use dates in your permalink structure then yes, option 1 will change the URL.
Or start the conversation in our Facebook group for WordPress professionals. Find answers, share tips, and get help from other WordPress experts. Join now (it’s free)!