
Themes are one of WordPress’ biggest selling points, but they’re not without their flaws. Even the most popular themes have bugs that need fixing, and they can often malfunction after an update. In short, you need to be ready, and WordPress child themes are perhaps the answer. However, safety from bugs is not the only benefit.
As their name implies, WordPress child themes are closely related to their “parents.” They enable you to fully customize your favorite themes, without incurring the risk of causing significant damage to your site or losing your hard work in case an update comes around.
In this article, we’ll talk a bit more about what WordPress child themes are, why they’re important, and how you can create your own (both manually and with plugins).
Key Steps to Create a Child Theme
- Step #1: Create a folder for your child theme
- Step #2: Make a new CSS stylesheet
- Step #3: Activate your child theme
- Step #4: Add a functions.php file
Let’s do this!
What WordPress child themes are (and why they’re important) 🚸
In a nutshell, WordPress child themes are a more stable option for making customizations to your website. Let’s explore some of the reasons why:
- They offer you a safe opportunity to get acquainted with your parent theme’s folder structure and its most critical files.
- Parent themes will usually erase any customizations you’ve made to them when they’re updated. Child themes enable you to keep your customizations separate from your base theme, and intact after updates.
- Any changes you make to your child theme can easily be reversed by simply disabling it.
Furthermore, WordPress child themes are relatively simple to set up. If you’re happy to tinker with some simple source code, read on for the simple steps you need to get a child theme up and running for your own site.
(If you’d prefer to avoid any code work, skip down to the conclusion, we have a plugin recommendation that will do most of the work for you.)
How to create WordPress child themes manually (in 4 steps) 👼
Before you roll up your sleeves, there are two things we need to do. Firstly, you should back up your WordPress site, which is always a good idea before implementing any major changes. There are plenty of ways to do so, but in general, we recommend using the UpdraftPlus plugin.
Secondly, we’re going to use a File Transfer Protocol (FTP) client throughout the steps below. If you’re not sure which one to use, check out FileZilla, and make sure you’re au fait with the ins and outs of how to use it.
With that out of the way, let’s get started!
Step #1: Create a folder for your child theme
For each new theme you set up on your WordPress website, a folder will be created within your back end. These folders contain all of your theme’s critical files, and it means we also need to create one for our child theme.
Adding an empty folder is straightforward. Open your FTP client and log into your site using the credentials you received during your sign up process (contacting your web host’s support if you can’t find them).
Once you’re in, head to the public_html > wp-content > themes folder. Right-click anywhere you like and select the Create directory option:

Any name will do for this new folder, but we suggest plumping for something that accurately identifies it. For example, twentyfifteen-child would be a good choice for a Twenty Fifteen child theme.
Step #2: Make a new CSS stylesheet
Now you have a child theme folder ready, it’s time to add your first file to it – the style.css file. This particular file – known confusingly as a Cascading Style Sheet (CSS) stylesheet – includes all of the rules for your theme’s design and overall look. Furthermore, any changes you make to your child theme’s stylesheet will override those of its parent.
Using your favorite text editor (you need to edit text in raw, so don’t use Word for this), create a file that includes the following code:
/*
Theme Name:     Twenty Fifteen Child Theme
Theme URI:      https://wordpress.org/themes/twentyfifteen/
Description:    Twenty Fifteen Child Theme
Author:         WordPress
Author URI:     WordPress.org
Template:       twentyfifteen
Version:        1.0.0
*/
Naturally, you’ll need to replace some of the text above depending on the theme you’re using as a base. There are two key sections you need to watch out for here – Theme Name and Template. The former determines the name your child theme will appear as on your dashboard, whereas the latter establishes its derivative parent theme. To get this right, make sure you include the exact name of the folder where your parent theme resides (located within wp-content/themes).
To finish, save the file as style.css and upload it to your child theme folder via FTP.
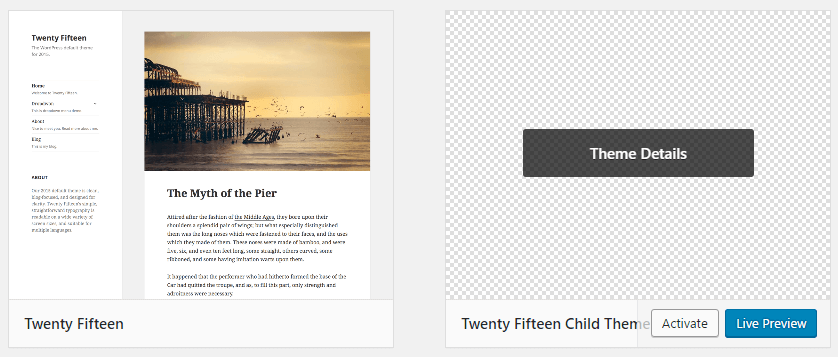
Step #3: Activate your child theme
If you’re able to activate a parent theme – which I’m sure you can – activating your child theme is child’s play. Navigate to the WordPress dashboard, and click on Appearance > Themes. Your new theme should display (albeit with a blank thumbnail), so locate it and click on Activate:
At this point, your child theme will be up and running, but if you check your front end, you’ll notice it’s all a mess. This is because your style.css file is still bare. Let’s fix that by importing its parent’s style.
Step #4: Add a functions.php file
Just as the style.css file governs your site’s style and layout, functions.php enables you to add advanced customizations and functionality to your themes. What’s more, it’s the file that will enable you to import the style of your parent theme and begin to get your child theme looking good.
We’ve covered this process thoroughly in our child themes documentation, including the code you need to enable the import function – just put this in your new file:
<?php
add_action( 'wp_enqueue_scripts', 'child_enqueue_styles',99);
function child_enqueue_styles() {
    $parent_style = 'parent-style';
    wp_enqueue_style( $parent_style, get_template_directory_uri() . '/style.css' );
    wp_enqueue_style( 'child-style', get_stylesheet_directory_uri() . '/style.css', array( $parent_style ) );
}
if ( get_stylesheet() !== get_template() ) {
    add_filter( 'pre_update_option_theme_mods_' . get_stylesheet(), function ( $value, $old_value ) {
         update_option( 'theme_mods_' . get_template(), $value );
         return $old_value; // prevent update to child theme mods
    }, 10, 2 );
    add_filter( 'pre_option_theme_mods_' . get_stylesheet(), function ( $default ) {
        return get_option( 'theme_mods_' . get_template(), $default );
    } );
}
There’s quite a lot there, so rather than type it out, copy and paste it into your own functions.php file, then save your changes. Once saved, you’ll need to upload it using FTP in the same way you did with your style.css file.
Now your child theme is created, uploaded, and activated, you can begin checking out some of the cool tricks you can implement using the functions.php file. This file isn’t just for simple style customizations – developers use this to add functionality to themes in order to make them unique. Quite simply, once you learn the ins and outs of this file, the WordPress theme world is your oyster!
Conclusion 🏁
WordPress child themes are a fantastic tool for streamlining your development process. They lower the risk of causing significant damage to your website while tinkering with its style, and they’re simple to set up. In short, there are practically no downsides to using child themes.
However, if you don’t fancy getting your hands dirty with code, you can use a plugin such as Child Theme Configurator to do the work for you:
There’s a nice installation guide provided by the plugin’s creators that you can check out.
On the other hand, if you don’t mind creating a few files and folders, here’s how you can create a child theme step by step:
- Create a folder for your child theme.
- Make a new stylesheet.
- Activate your new theme.
- Add a functions.php file and inherit your parent theme’s style.
Do you have any questions about how to create WordPress child themes? Ask away in the comments section below!


Hi,
The Big Title Section does not appear in the Customise -> Frontpage tab . I set up a child theme properly and it does not appear anywhere.
Best Regards
Or start the conversation in our Facebook group for WordPress professionals. Find answers, share tips, and get help from other WordPress experts. Join now (it’s free)!