
Trying to build a landing page on WordPress for your product launch but not sure where to start? Never fear! It’s easy to build a product launch page with Elementor. And in this guide, I’m going to show you exactly how.
I’ll show you a step-by-step guide going from a completely blank canvas to a finished landing page. Best of all, I’ll do it using only free plugins. If that sounds like your kind of tutorial, join me and let’s get started.
Why should you build a product launch page with Elementor?
Elementor is a great tool to build a product launch page for a few reasons:
First, it’s a drag and drag visual page builder, which means you can design complicated pages without needing to know any code. You can also design your pages in the same view that your visitors will see, which is helpful to visualize how the different elements on your page work together.
Beyond that, Elementor is a great option because:
- It works with all WordPress themes, including all our WordPress themes here at Themeisle
- All the designs created by Elementor are responsive (AKA they look great on mobile phones, too)
- Elementor has a lot of pre-built, beautifully designed page templates for free
- It includes helpful design “elements” that make it easy to create an attractive landing page
Basically, while you still will need some design vision and a general knowledge of the elements that go into a landing page, Elementor can handle the rest and remove the difficulty of needing to know code from the equation.
What you’ll be building in this guide
Before jumping into the actual guide, I want to show you a quick look at our final result after we build a product launch page with Elementor:

You can always improve on the final design with more elements and styling (I’m not great when it comes to color palettes, for example). But that’s just a basic look at what you can do with Elementor in well under an hour of work.
Let’s get started!
Step 0: Install the plugins
Before you start to build a product launch page with Elementor, your first step is to actually, well, install the free version of Elementor. While the Pro version does offer several helpful features and pre-built Elementor Pro templates, I’m going to use the free version for this post because I want to make this guide as accessible as possible.

As for the theme, I’m going to use the free version of our Hestia theme. You can use whichever theme you prefer, though. Just make sure it’s one that allows a full-width template!
Step 1: Pick the right template for your launch page
Templates allow you to change the basic “canvas” that you build your product launch page with.
For example, most WordPress pages include a sidebar. That’s good for regular pages…but not for a product launch page.
You want your landing page to be the only thing grabbing people’s attention.
There are two ways you can go about this:
- Full-width template – you can build a completely full-width landing page, but your normal WordPress header and footer are still active.
- Blank canvas – you build your page from absolute zero. Not even your WordPress header appears.
Both methods are a viable route to build a product launch page with Elementor, but I prefer just using a full-width template so that the navigation structure feels more cohesive across the entire site.
That’s what I’ll be using for this guide.
To select your own template, go to Pages → Add New and choose from the drop-down in the Page Attributes box:

If your theme doesn’t offer a full-width template, you can either use the blank Elementor Canvas template or choose a different theme. We have a list of themes that work well with Elementor.
Once you choose your template, click Save Draft to apply the new template (it’s important that you do this before you start editing). Then, hit the big Edit With Elementor button.
You should see the blank canvas from which you’ll build your launch page:

Step 2: Choose your starting point
Ok, I’m going to show you how to build a product launch page using Elementor from the ground up. But you definitely don’t have to start from a blank canvas.
If you’d rather use one of Elementor’s professionally designed templates, you can access them by clicking the Folder icon in the very bottom left and selecting Templates Library:

Many of the templates require Elementor Pro, but you can still find plenty that are available in the free version:

In addition to benefiting from professional design, these templates can also save you a ton of time.
If you see one that you like, I definitely recommend using it. Otherwise, let’s forge ahead with our blank canvas.
Step 3: Building your launch page structure
Before you get started, it helps to know where you’re going. That is, you want to have a basic idea for the structure of your launch page before you start dragging over Elementor elements.
For example, here’s Karol’s rough sketch of what a basic launch page looks like:
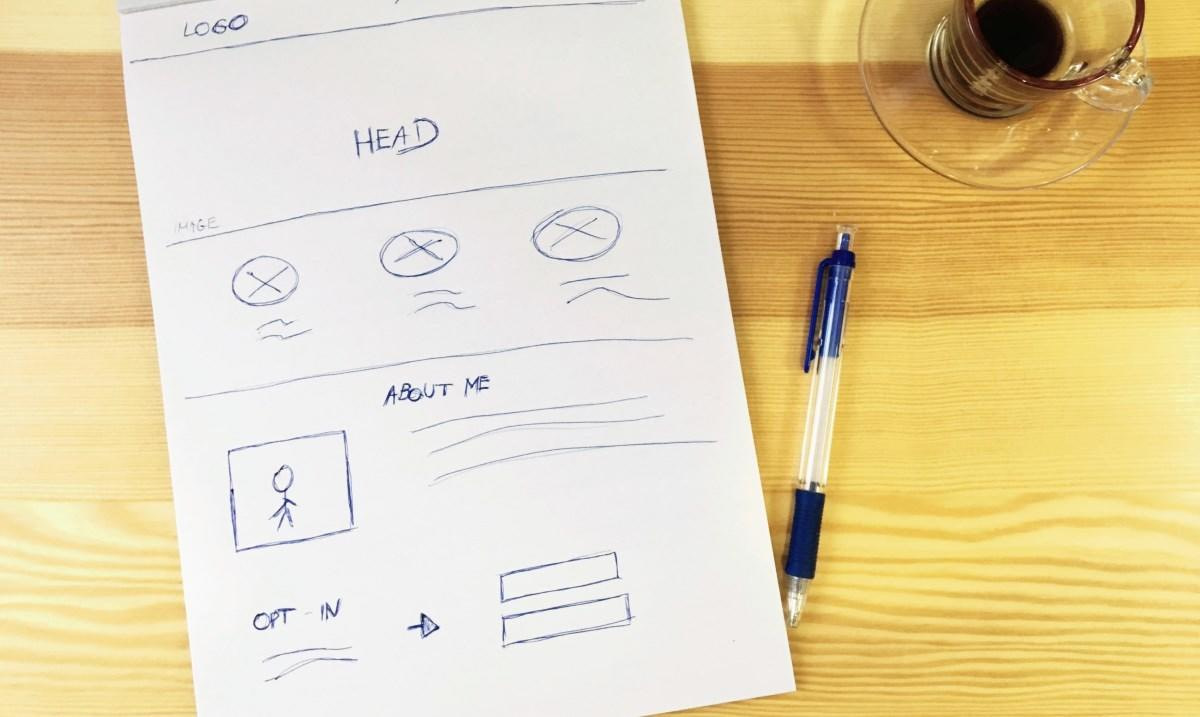
If you look at the sketch, you’ll see that there are roughly four sections:
- Main headline section
- The “Feature list” section
- About section
- Email opt-in section
Elementor lets you create individual Sections that you can add your elements to. For this example launch page, we’ll use four different sections for each of the elements above.
A quick tour of the Elementor interface
Before I start diving into the landing page example, I think it will be helpful to give you a quick tour of the actual Elementor interface.
The interface is comprised of two core elements:
- Sidebar – this is where you’ll add new elements and edit existing ones
- Visual preview – this is where you can preview your final design exactly as your end users will see it
“Elements” are basically design blocks. For example, a button is one element. An image is another. And so on.
To actually build a product launch page with Elementor, the basic process goes like this.
You drag over an element from the sidebar:

Then, you customize the element in the same sidebar interface:

Notice that the sidebar now has three different tabs:
- Content – the most important tab – where you customize the basic content and function of the element.
- Style – this is where you can change colors and typography
- Advanced – this is where you can add custom margins and padding, as well as other advanced settings. Custom margins are especially helpful for changing your elements’ positioning.
Alright, now that you know the basics, let’s build a product launch page with Elementor!
Building the headline section
To create the headline section, first click on Add New Section:

Then, select your column setup. I’ll use this two-column option for this example, but your choice depends on your desired design:

Let’s make the larger right column an image and use text in the left column.
To add an image to the right column, just drag over the Image element:

Then, select your image in the sidebar interface:

To add text to the left column, you can use a combination of the Heading and Text Editor options:

To change the alignment and positioning of your elements, you can always go to the Advanced tab and manually change margins and padding:

I used custom top margins for both headings in the example.
If it fits your goals, you can also add a button by dragging over the Button element:

And that finishes up our basic heading section!
Creating the feature list section
Next on our list, we need to create a feature list section that tells people the key features of our product.
Thankfully, Elementor includes an element that’s absolutely perfect for this.
To use it, let’s first create a three column section to house our three features:

From there, we can use the Icon Box element under the General Elements section:

Put an icon box in each column. Then, all you need to do is customize the text and icon for each feature:

And that wraps up our feature list! Easy peasy.
The Image Box element is also another good option for this section if you’d like to use your own images instead of icons.
Creating the “About” section
Next up, let’s build our “About” section. This one is pretty flexible as far as design goes.
If you’re not sure where to start, a good option is an offset two-column design:

On the left side, let’s put an image by dragging over the Image element. Then, we can use Heading and Text Editor elements to write some basic about text:

And we’re almost done with our launch page!
Creating the email opt-in section
Building an email opt-in section is a little tricky with the free version of Elementor because it doesn’t include a dedicated form element. If you purchase the Pro version, you can create all types of forms just by dragging over the Form element.
But to create an opt-in form with the free version of Elementor, we’ll need to get creative with a third-party plugin. I’ll use the free OptinEngine plugin for this guide, but you can use any plugin that lets you insert opt-in forms with a shortcode.
First, you’ll need to create a form in the OptinEngine interface:

Then, create a new section in Elementor and add the Shortcode element:

Paste the shortcode for your OptinEngine form into the box:

You won’t see your form in Elementor’s interface quite yet. But once you publish your page, you will see the form on the front-end.
And that’s pretty much it for our basic product launch page!
Putting it all together
In the end, here’s another look at our final product:
Again, the colors could certainly be enhanced (I’m not actually a professional designer!). But all in all, we were able to build a product launch page with Elementor without looking at a single line of code.
And that’s pretty awesome!
If you want to make it your main page, all you need to do is set up a static homepage.
Remember, to create an exact duplicate of the example landing page, all you need is:
- The free version of Elementor
- Our free Hestia theme
- The free OptinEngine plugin (or any other shortcode-based opt-in plugin)
I hope you enjoyed the tutorial and please let me know if you have any questions!


Yeah solved.. thanks
But how to add , add to cart functionality to the buy now button? How to do it ? There are no guides explaining that .
Hi Sizzor, the answer depends 🙂 Elementor Pro does include WooCommerce widgets. So if you’re selling something via WooCommerce, you could use those.
While Elementor does include some functional widgets, it’s more about the design than the functionality. For that, you can check out other plugins. We wrote about some ways to accept payments on WordPress https://themeisle.com/blog/accept-payments-with-wordpress/
Thanks Colin. Very helpful tutorial. Let me go and build mine.
Or start the conversation in our Facebook group for WordPress professionals. Find answers, share tips, and get help from other WordPress experts. Join now (it’s free)!