
Learning how to hide a featured image in WordPress is a useful skill to have in your toolbox. This way, you have the utmost flexibility when deciding which featured images to show and which ones not to.
In this post, we guide you through different methods to hide featured images in WordPress. You can do it by:
- Conditionally hiding featured images using a plugin
- Hiding featured images with code
- Hiding featured images using your theme’s settings (if available)
Keep reading to learn about them all.
Method 1: Use a plugin that hides featured images conditionally
Featured images appear in two locations:
- Posts/Pages: somewhere (usually at the beginning of every individual post you create), assuming you’ve uploaded featured images
- The Blog page: the list of posts you have published on your website
If you think about conditionally hiding or displaying featured images, you can do it with a plugin.
In layman’s terms, that’s a fancy way of saying you can hide a featured image on specific pages, and it’s all handled by a plugin.
For this, you’ll use the plugin called “Conditionally display featured image on singular posts and pages.”
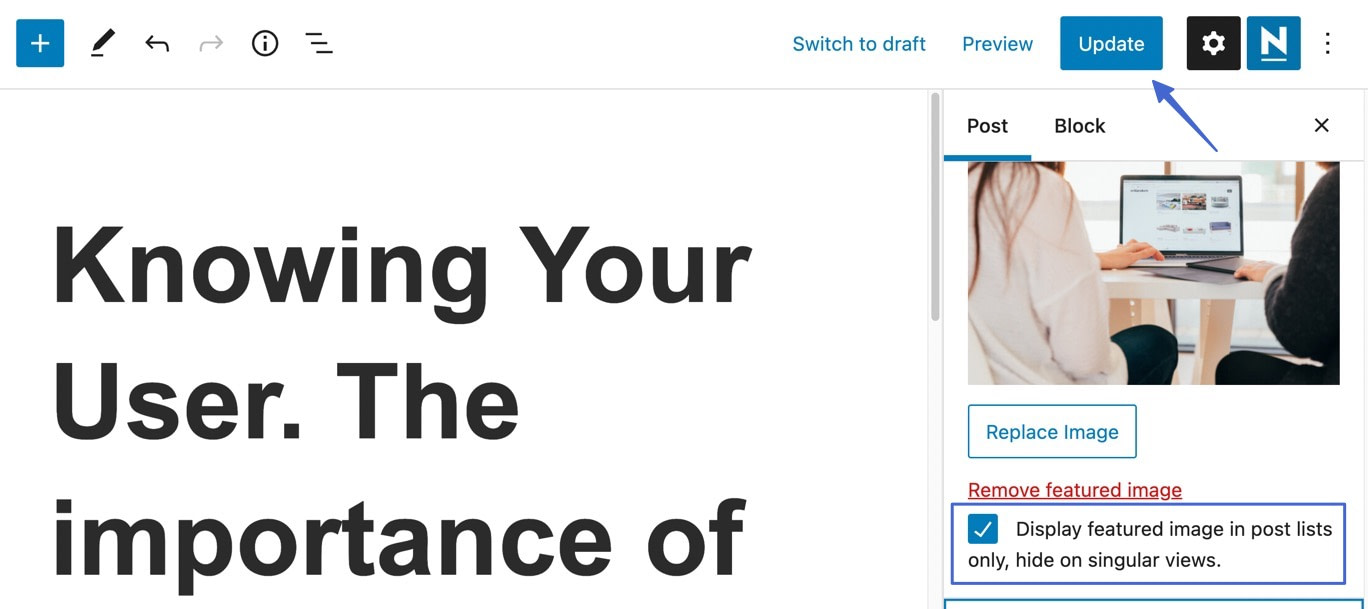
Install and activate the plugin, then go to Posts in WordPress. Select a post for which you’d like to hide the featured image.
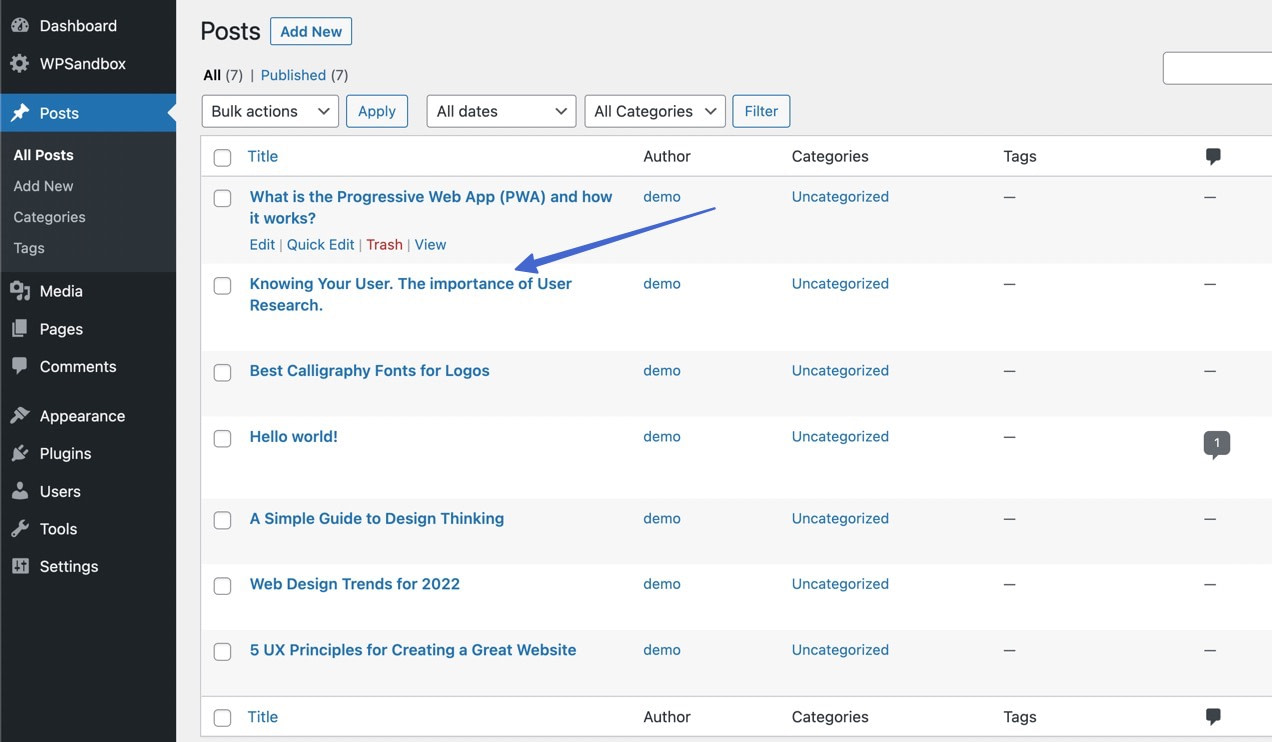
Under the Post tab (to the right) find the Featured Image section.
With the plugin now installed, you’ll see an option to “Display featured image in post lists only, hide on singular views.”
Mark that checkbox to activate the feature.

Be sure to click the Update or Publish button to make the changes live.
You’ll notice the plugin still leaves thumbnail featured images in your Blog page list.

Yet, the true purpose of the plugin is to hide the featured image—without forcing you to delete the image—on only one post or page.
And for that, it works perfectly.

Method 2: Hide featured images using code
Hiding featured images with CSS code is the most technical method, but it gives you the power to target the specific posts where you want to hide the featured image.
However, you might need to know some basic CSS to adapt these snippets to your theme.
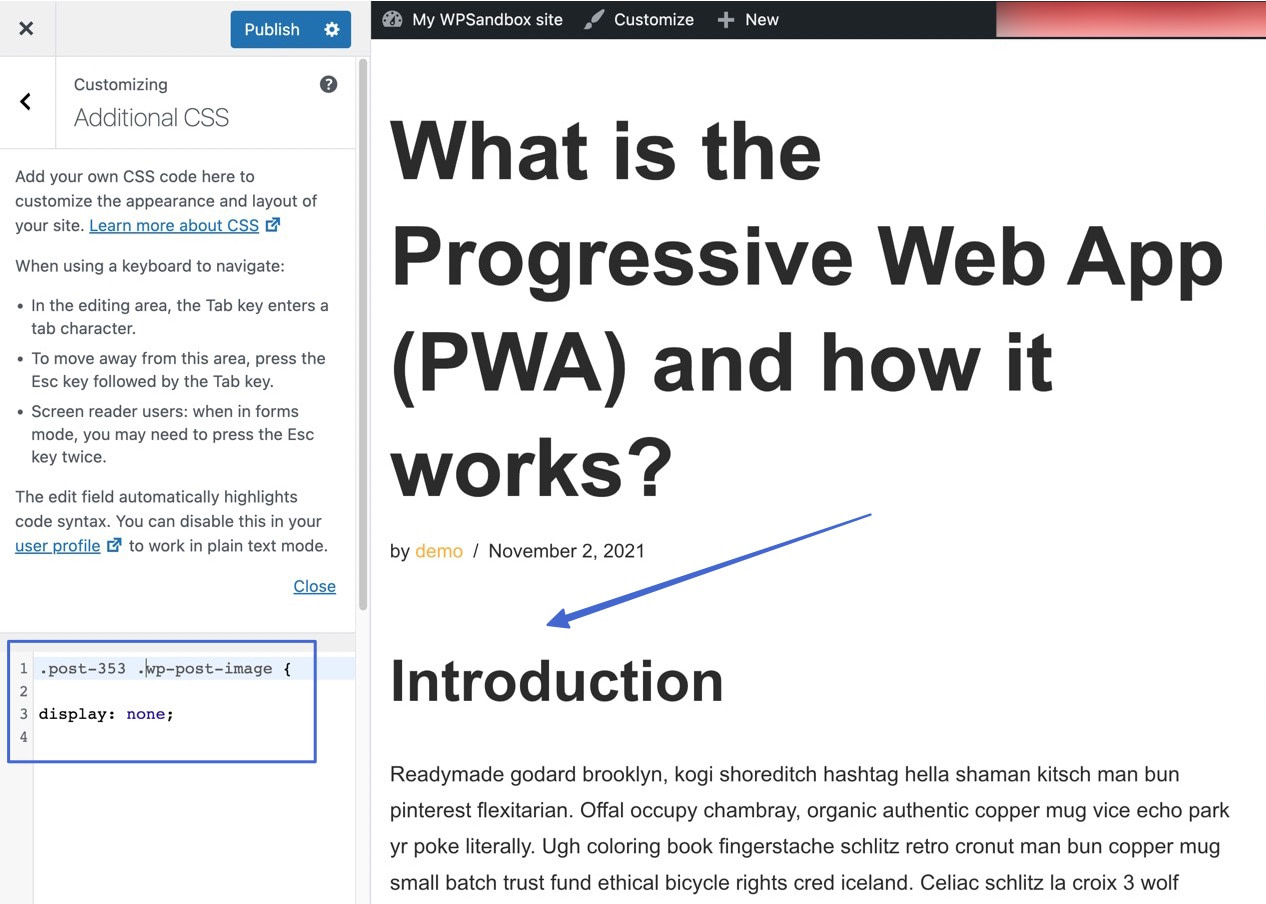
To hide the featured image for a certain post using CSS, go to Appearance > Customize, then navigate to Additional CSS.
Paste this bit of code into the Additional CSS field:
.post-123 .wp-post-image {
display: none;
}
Click Publish.
Then, simply replace the 123 with the ID number associated with the desired post.
Find that number by opening the post editor. There, you can look to the WordPress editor URL in the browser, which says a number after post=.

After getting the code, and the right post number, into the Additional CSS field, be sure to click the Publish button. WordPress then hides the featured image for that post and no others.
💡 Keep in mind that the Blog page on your website still shows its featured image thumbnails with this method.

In addition, you should be able to visit other posts, besides the one in which you hid the featured image, to see their featured images.

Method 3: Use your theme’s settings to hide featured images (if available)
Many WordPress themes already have options to hide featured images, so it’s wise to check your theme settings before messing with more complicated measures like coding. However, keep in mind that this method might not work for you if your theme does not provide this setting.
👉 To help you get an idea of where to look to find this option in your theme, let’s take the Neve theme as an example. It allows you to hide the featured image sitewide or only on specific posts. You can also choose between hiding featured images from the blog listing page, the single post page, or both.
Let’s go through the different options:
Hide featured images from blog listing pages
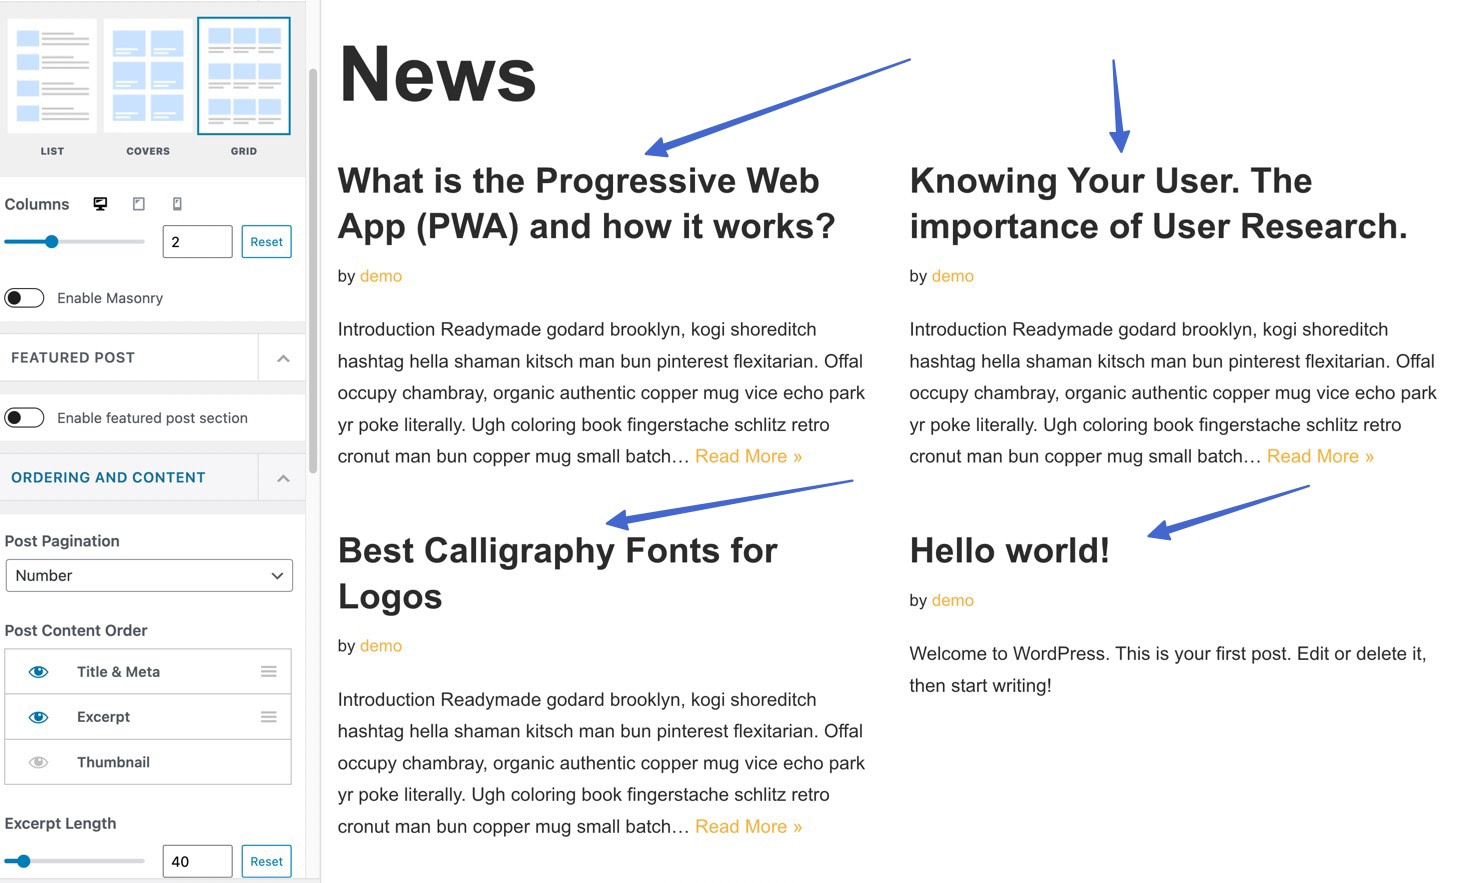
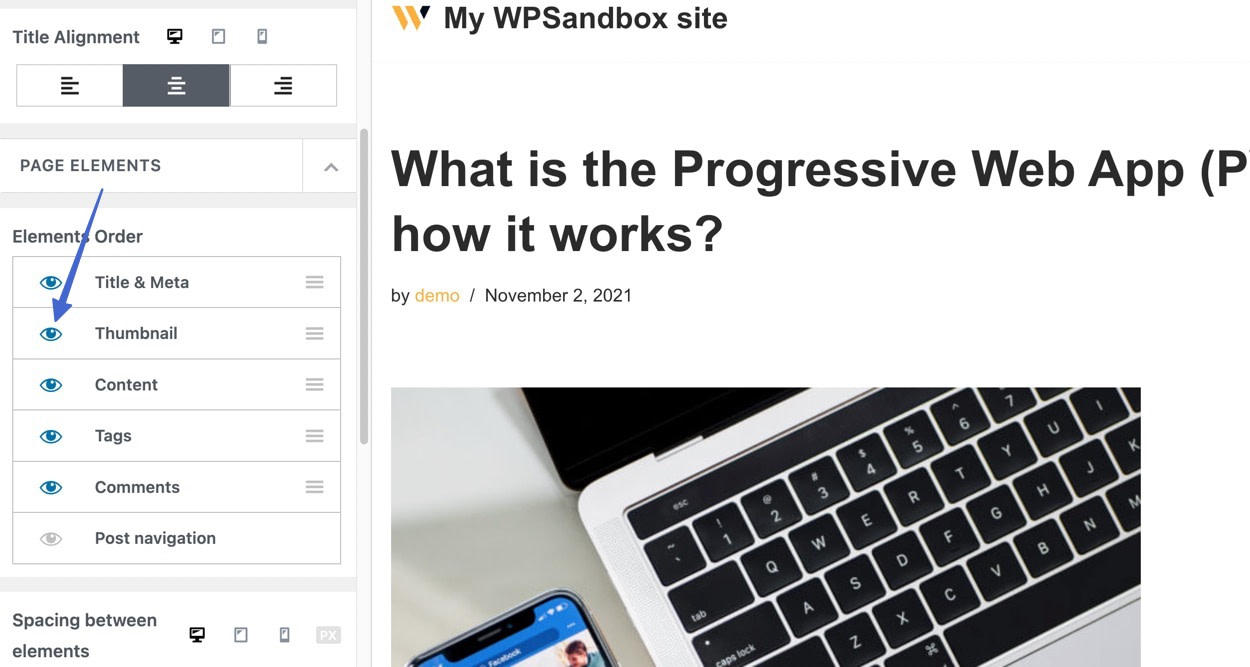
With Neve installed, go to Appearance > Customize in WordPress, then click on Layout > Blog/Archive.
Find the Post Content Order section, then click the Eye icon where it says Thumbnail.

That deactivates the display of the “Thumbnail,” which is another word for featured image, when talking about the images on your Blog page.
With that, every single post with a featured image hides the photo on the Blog page. As a result, the Blog page comprises only post titles, descriptions, and whatever metadata you include.
Hide featured images from all single post pages
The Neve theme also offers the option to hide all featured images on the actual posts.
If you use the method in this section, it will hide the featured image for every single post. However, in the next section, you’ll learn how to just hide the featured image for individual posts.
To begin, navigate to Appearance > Customize in WordPress, then click on Layout > Single Post.
If you have a Normal header layout, scroll down to the Elements Order section of the Customizer.

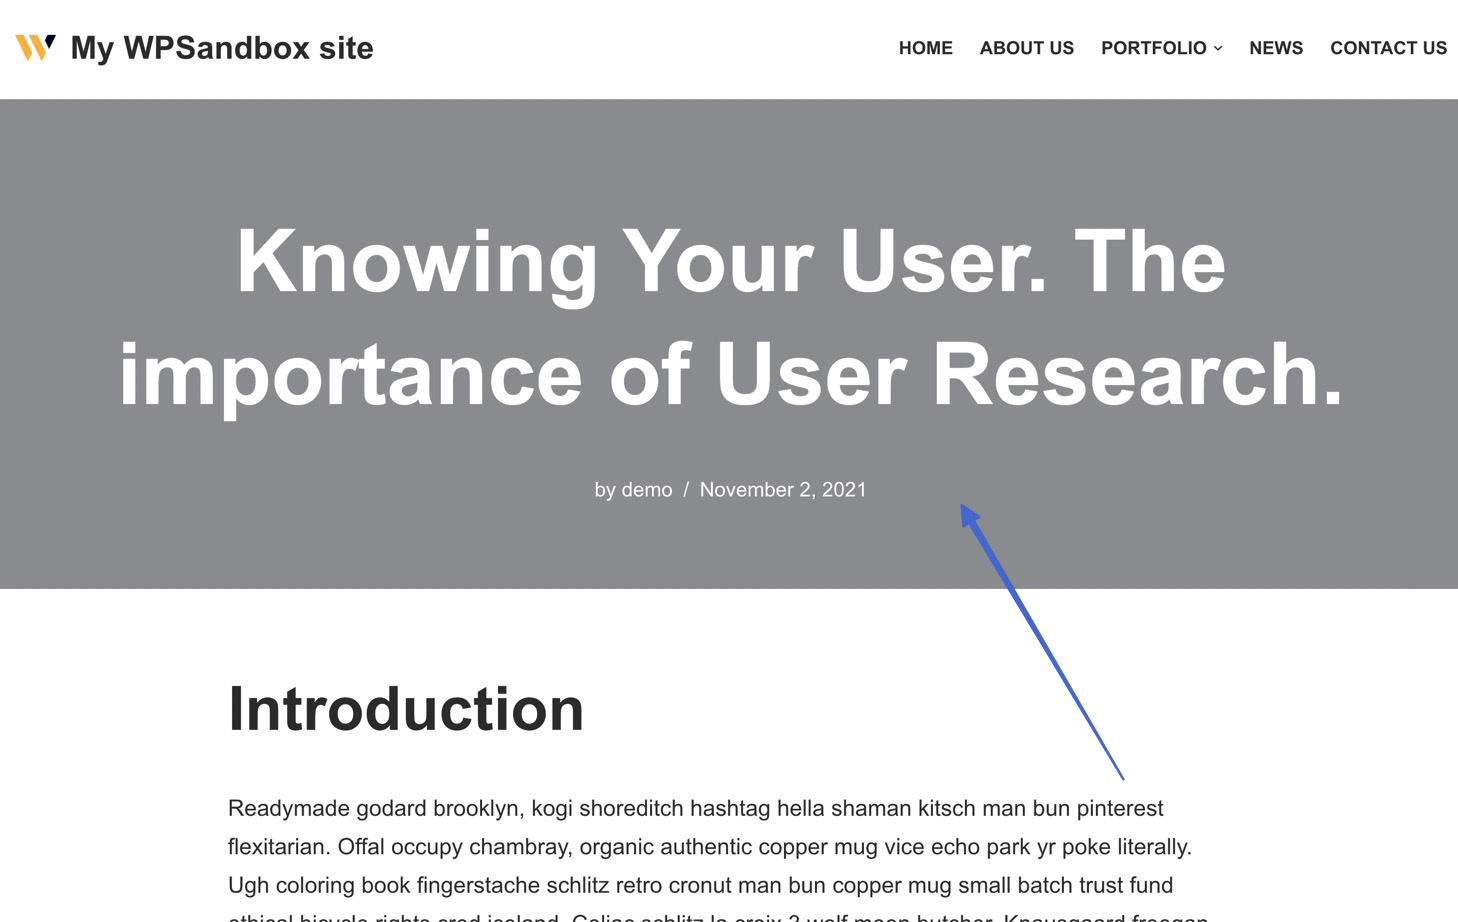
Unmark the Eye icon next to the Thumbnail element.
That hides the “Thumbnail,” (another name for a featured image) from view on the post.

If you’re using a Cover header layout, the process is slightly different.
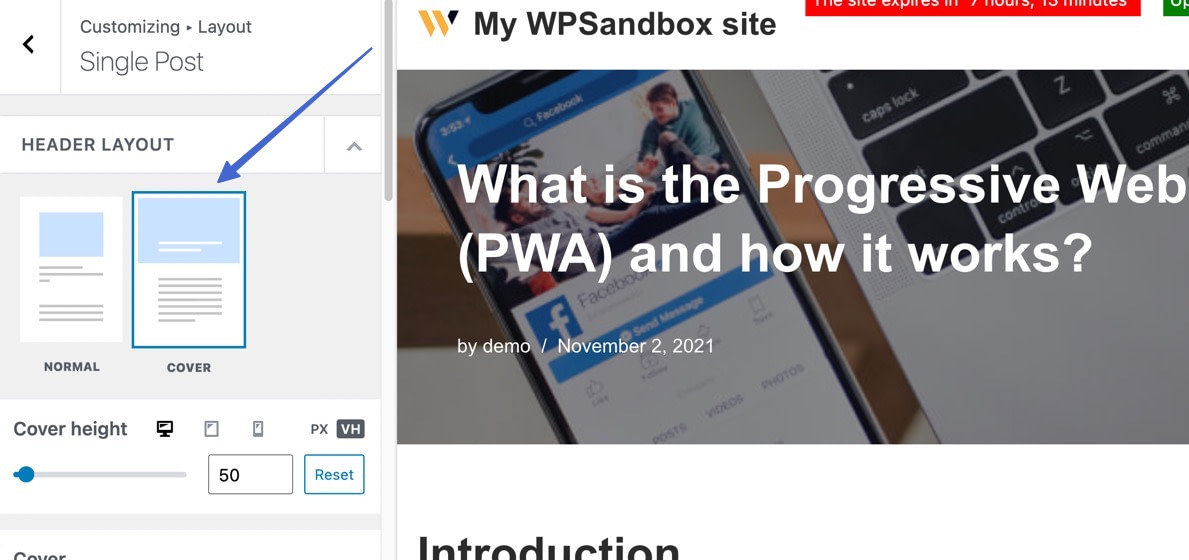
Scroll down in the Layout section of the Customizer to find a setting to Hide Featured Image. Flip that switch, and hit the Publish button.

With the setting activated, you’ll see that the featured image gets hidden from the post.

Not only that, but every single post, across your entire website, hides their featured images as well.
💡 Keep in mind, however, that hiding the featured image for posts in the theme settings still leaves them visible on the Blog page. So, it’s a wonderful option if you want less clutter on the posts but still like thumbnail featured images on the Blog page.

Of course, you can also remove the thumbnail featured images, as discussed before.
Hide featured images for individual blog posts
Finally, Neve (and many other popular themes) also gives you options to hide the featured image from an individual post’s page, while leaving them activated by default.
To access this setting, open the editor of the post where you want to hide the featured image. Then, click on the Neve icon in the top-right corner to open the Neve Options. You can then turn off the featured image in the Elements section.

Summary
It’s not immediately clear in WordPress how to remove or hide a featured image, but there are some tools to make it work—and for different situations like removing a featured image from one post or all posts.
In this article, we covered the handiest options to hide featured images, including:
- Conditionally hiding featured images in WordPress by way of plugin
- Hiding featured images with CSS code
- Hiding featured images with your theme settings (if your theme allows you to)
If you’re overwhelmed 😟 by creating featured images for each post, we also have a post that shows you how to easily create featured images using Canva ⬅️.
Do you still have any questions about how to hide the featured image in WordPress? Ask us in the comments!


thanks. fourth option was exactly what I needed.
Great that you found something useful for yourself. 🙂
Or start the conversation in our Facebook group for WordPress professionals. Find answers, share tips, and get help from other WordPress experts. Join now (it’s free)!