
Your site’s User Experience (UX) plays a critical role in its performance. It determines how visitors perceive your brand and interact with your content. Therefore, you’ll want to do a UX site audit every few months to ensure that your site is running smoothly.
By learning how to identify weak areas on your site, you can take the necessary steps to improve your user experience. This may, in turn, lead to higher conversion rates and engagement levels.
In this post, we’ll take a closer look at how a UX site audit works, and why it’s important. Then, we’ll walk you through five essential steps to help you perform your first audit. Let’s dive right in! 🐟
What is a UX site audit?
User Experience (UX) refers to the usability and accessibility of your website. Ideally, users should be able to navigate your site and interact with your content without any issues. If your site is glitchy, difficult to use, and slow-loading, it can translate into a poor user experience.
A UX site audit can help you ensure that you’re offering the best possible experience to users. It entails checking your site for any design or navigation issues and implementing measures to improve its performance.
Why is it important to do a UX site audit?
A poorly designed or glitchy site can turn visitors away. This can result in higher bounce rates and fewer conversions.
A UX site audit can help you identify issues on your site that might be causing problems for users. These may include intrusive popups, broken links, or confusing layouts. By doing a thorough audit, you can ensure that users are able to easily engage with your site, whether they’re accessing it from a computer or mobile device.
It would be ideal to do a UX site audit every three or four months. This is particularly important if you’re constantly adding new content or re-designing pages.
Additionally, updates to plugins and themes can cause design or functionality issues on your site. For example, a button might stop working or the contact form fields might become jumbled.
Unless a user points out a problem on your site, you might remain oblivious to it for a very long time. Therefore, performing regular UX site audits can help you find and fix issues before they can have a significant impact on your business.
How to do a UX site audit
Now, let’s look at how to perform a UX site audit in five steps. The following steps can be applied to any website, regardless of the platform you use.
- Step 1: Explore your site as a visitor
- Step 2: Find weak spots on your site
- Step 3: Test menus, buttons, and forms
- Step 4: Evaluate user metrics and performance data
- Step 5: Identify and implement the solutions
Step 1: Explore your site as a visitor 👨💻
The first step is to put yourself in the shoes of your visitors. You’ll need to explore your site as a frontend user and evaluate the experience.
At this stage, you’ll want to look at two main factors:
- How easy it is to find and use the main navigation menu
- If the site is structured in a way that makes sense and facilitates a smooth browsing experience
Users should be able to navigate your site intuitively, without having to spend so much time trying to figure out where to find essential information like contact details.
Of course, since you’re already familiar with your site’s content, it can be difficult to make an objective evaluation. Therefore, you might want to ask other people to browse your site and provide feedback.
🦉 Remember to check your site on both desktop and mobile devices.
Step 2: Find weak spots on your site 📉
The next step is to make note of all the problems that you encounter as you browse your site. These may include:
- Slow-loading pages and elements
- Poor-quality photos
- Messy layouts
At the moment, we’re just looking at issues that are glaringly obvious to users, and which might put them off straight away. Slow loading times may be the main culprit behind a high bounce rate, so you’ll want to visit every key page on your site to see how it fares in terms of speed.
Step 3: Test menus, buttons, and forms 🔎
Now, it’s time to dive a little deeper and test individual elements on your pages. Depending on the size of your site, this task may take a while and feel a little cumbersome.
However, you can start with the most important elements on the page, such as your main navigation menu, call-to-action buttons, and contact forms. You’ll need to ensure that these features work as they should and look good on different devices.
If you have an online shop, it’s a good idea to do a test purchase. This way, you can make sure that your “buy now” and “add to cart” buttons are working properly. It also enables you to evaluate the checkout process from a user’s perspective.
Step 4: Evaluate user metrics and performance data 💾
User metrics can say a lot about your site’s UX. If you use Google Analytics, take a look at the average engagement time on your website:
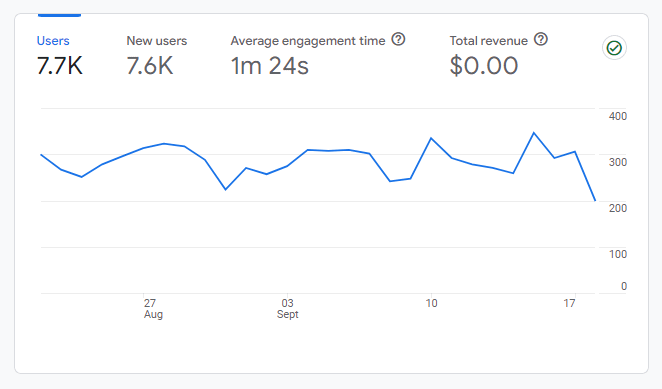
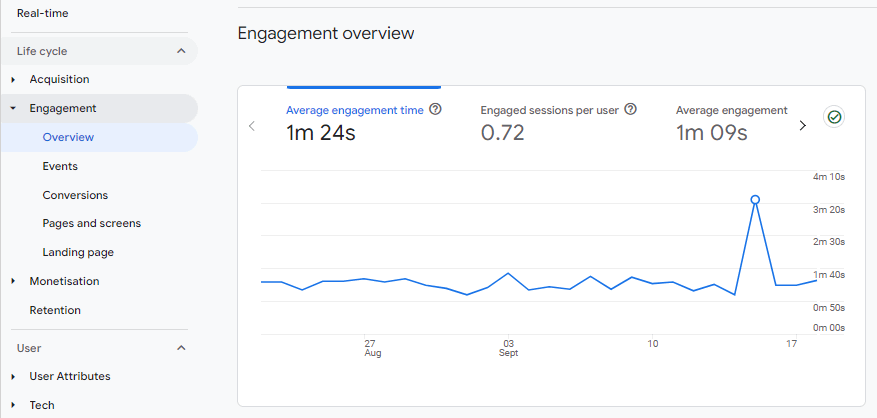
A low engagement time indicates that many users exit the site within seconds, without exploring other pages or interacting with your content. If you click on the Engagement tab within Google Analytics, you’ll get a breakdown of the engagement time by page and other factors:
It’s also worth doing a site speed test, using a tool like Google’s PageSpeed Insights. This will highlight any elements on your site that may affect the user experience:
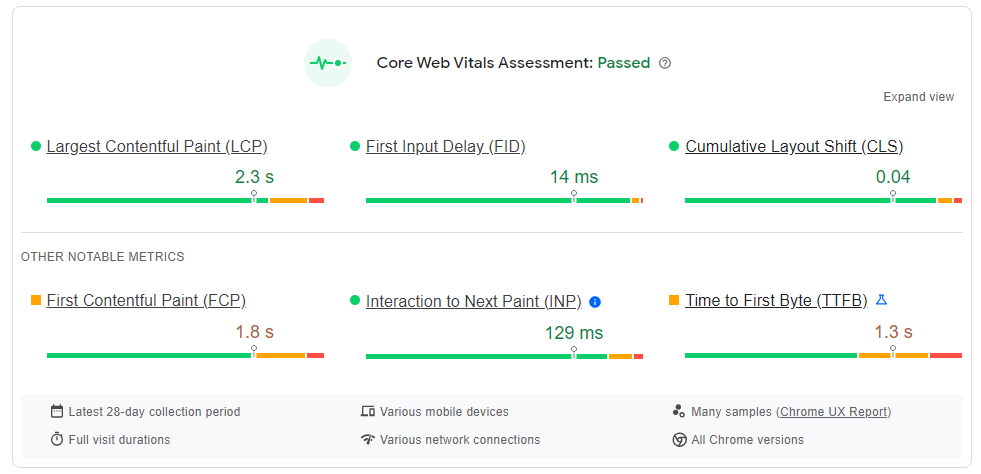
For example, if you get a poor score for Cumulative Layout Shift (over 0.1), it means that there are several elements moving around the page as it loads. This can hinder user interaction.
Another important metric to look at is First Input Delay (FID). This measures the time from when a user first interacts with a page (e.g., by clicking on a button) to the time the browser starts to process the request. If your FID score is more than 100 milliseconds, your users are likely experiencing slow loading times as they try to interact with your content.
Step 5: Identify and implement the solutions 💡
Now that you’ve identified some problems with your site’s UX, it’s time to implement the solutions. These will vary depending on your findings, but we’ll look at some effective steps you can take to provide a better experience.
👉 If your site is slow and you have poor engagement levels, try the following:
- If you’re using WordPress, switch to a minimalist theme and remove any unnecessary elements from your site
- Compress large image files and videos
- Consider using a Content Delivery Network (CDN) and a caching solution to deliver content more quickly
👉 If you find that your site is a bit tricky to navigate, you might consider these solutions:
- Organize your content into parent pages/categories and child pages/sub-categories
- Use bolder colors for your CTAs to make them stand out
- Simplify your forms
- Use a cleaner menu
- Create a one-page checkout for a smoother shopping experience
You’ll also need to fix any broken links or buttons you encountered during the audit. Once you’ve made the necessary changes, you should revisit your site as a user and make sure that you haven’t missed anything.
Conclusion 🧐
A UX site audit can help you ensure that users are able to interact with your site without any problems. It also enables you to fix performance and design issues that may be affecting your conversions and engagement rates.
👉 To recap, here’s how to do a UX site audit in five steps:
- 👨💻 Explore your site as a visitor
- 📉 Find weak spots on your site
- 🔎 Test menus, buttons, and forms
- 💾 Evaluate user metrics and performance data
- 💡 Identify and implement the solutions
Do you have any questions on how to perform a UX site audit? Let us know in the comments section below!


Or start the conversation in our Facebook group for WordPress professionals. Find answers, share tips, and get help from other WordPress experts. Join now (it’s free)!