
When it comes to managing your website, dealing with issues like plugin conflicts and coding errors can be a bit tricky. But don’t worry, we’ve got your back! In this guide, we’ll walk you through setting up a WordPress error log. Think of it as a journal that keeps track of error codes and timestamps on your site. It’s your troubleshooting buddy, and we’ll show you how to use it in debug mode. Let’s dive in!
Key Takeaways
- Activating WordPress debug mode requires adding simple code to your
wp-config.phpfile, making error tracking easier. - To keep your site secure and user-friendly, ensure errors are logged but not displayed publicly by tweaking your debug settings.
- For those less comfortable with code, using a plugin like WP Debugging can automate the process, streamlining error management.
📚 Table of contents:
- When should you set up a WordPress error log?
- How to set up a WordPress error log
- How to use a WordPress error log plugin
- Checking your WordPress error logs
- How to fix issues that you discover in the error log
When should you set up a WordPress error log?
Consider setting up a WordPress error log in the following situations:
- When you see a blank screen while trying to load your website.
- When a warning with an error code (401, 404, 500, etc.) appears.
- If your entire site crashes.
- If you’re noticing slow website performance.
- If a plugin or theme isn’t working properly.
- If you’re curious as to which plugins or themes are causing performance issues.
How to set up a WordPress error log
As is often the case with WordPress, you have two routes to enable error logging with WordPress debug mode:
- Manually
- With a plugin
We’ll start by showing you the manual method, which just involves adding a few code snippets to your site’s wp-config.php file.
Then, if you want an even simpler option for error logging, we’ll share a free plugin that can get the job done.
Here’s how to do it manually…
Click here if you’d rather jump to the plugin 👈
Step 1: Access and edit the wp-config.php file 🖱️
If you’re not familiar with your wp-config.php file, it’s one of the core files for holding important configuration details, like the credentials for your site’s database.
To access the wp-config.php file, either download and use an FTP client or a file manager tool in your host’s cPanel.
How to use FTP to connect to WordPress 👈
For this tutorial, we’ll cover the steps to access and edit your wp-config.php file with an FTP client.
In your FTP client, locate the wp-config.php file. This is normally in the root site directory.
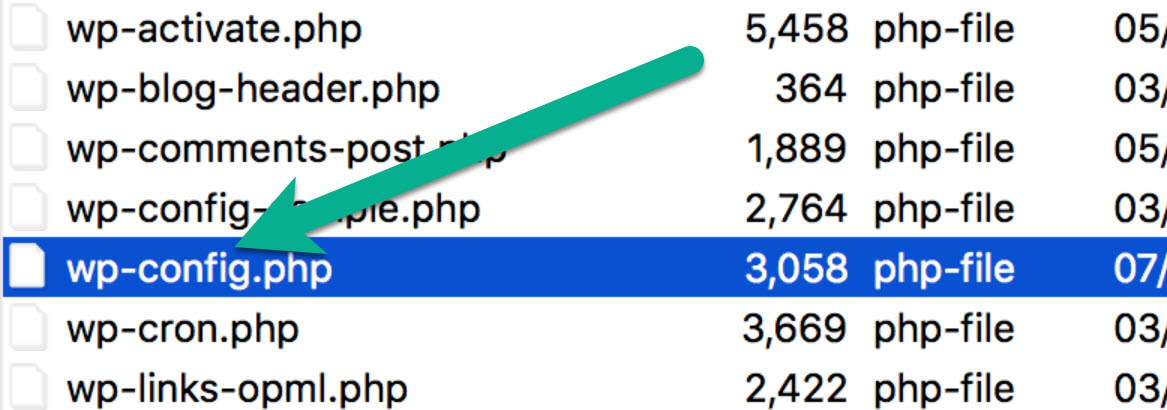
Upon finding the file, right-click on it and select to edit or view the file. You’ll want to open the file in a text editor.
Step 2: Add a line of code in the wp-config.php file to turn on debug mode 👨💻
Inside your text editor, search for a line of text that reads Stop editing! Happy blogging.
Place your cursor on the empty line above that line of text.
Paste in the following code:
define( 'WP_DEBUG', true );If you already notice this line of code in the file, it may currently be set to false. If that’s the case, switch it to true.
Afterward, save the file to your computer and upload the wp-config.php file as an update to your website. This is done through the FTP client.
Great! Now debugging mode is activated for your WordPress site.
Step 3: But wait! I don’t want the errors to show on the frontend of my website ⚠️
If you took a moment to check your dashboard or the frontend of your site, you may have already seen WordPress errors listed for everyone to see. This may not seem like a big deal if they show up on the WordPress dashboard, but you definitely don’t want the warnings on the frontend.
Not only is publicly displaying errors confusing for your visitors, but it can also be a security risk because it gives them detailed information about your site.
In short, debugging mode is messy when activated by itself.
Therefore, we need to log the errors in WordPress so they are recorded but not publicly displayed.
To log your errors, go back to that exact same wp-config.php file in the text editor.
Look at the debug code you recently pasted into the file. Paste the following new code on the empty line below the debug code:
// Enable Debug logging to the /wp-content/debug.log file
define( 'WP_DEBUG_LOG', true );

// Disable display of errors and warnings
define( 'WP_DEBUG_DISPLAY', false );
@ini_set( 'display_errors', 0 );
Again, in some situations you might discover that the debug log code is already included. For that, simply make sure that the false at the end of the code is changed to true.
The first line tells WordPress to save error messages to a file called debug.log. The second snippet tells WordPress not to publicly display error messages.
Now, your error messages will be safely saved in the log file, but neither you nor your visitors will have to see error messages while browsing your site.
For a second time, save the wp-config.php file in your file editor and upload it back to your WordPress website.
How to use a WordPress error log plugin
If you don’t feel comfortable working directly with your site’s configuration file, you can also use the free WP Debugging plugin:
As soon as you activate the plugin, it instantly activates WordPress debug mode and enables error logging. It also lets you control whether or not to display debug messages on your site by visiting Tools -> WP Debugging.
Checking your WordPress error logs
We’re assuming you already know the website pages that are alerting you of errors.
You must visit these pages now that the debugging log is configured and ready to store the errors.
Reconnect to your website files using the FTP client. You can also connect via your host’s cPanel.
Go to the /wp-content/ folder.
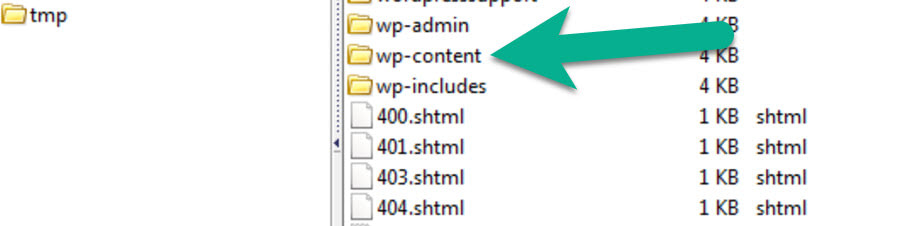
Open that folder and look for a file called debug.log.
This is the file you created from the previous steps.
What should I do with this debug log file?
The debug.log file is accessible by editing, viewing, or downloading the file. It’s similar to the previous steps, where you might either just preview the file to look at it or open it in a file editor to make changes and save it for later.
Overall, a debug log file is for reference, not for editing. Therefore, you have to sift through the list of errors and warnings to identify what’s wrong with your site, theme, plugins, or code.

For most people, the error log codes mean nothing. If anything, it’s closer to gibberish than English. However, you don’t want to forget about those errors.
Your resolution steps should go like this:
- You identify an error with the debug log.
- You find the error code.
- You look up what that error code means.
- You utilize a separate guide to fix that error.
How to fix issues that you discover in the error log
Unfortunately, there’s no one-size-fits-all approach to fixing problems that you might discover in your site’s error log.
However, we do have lots of existing posts on how to fix common WordPress errors:
- A beginner’s guide to WordPress troubleshooting
- The most common HTTP error codes and how to fix them
- A guide for checking for plugin compatibility issues
- What is a 401 error and how do you fix it?
- How to fix any 404 errors with redirects
- How to fix the 500 internal server error in WordPress
- 4 ways to fix an error when establishing a database connection
- How to fix the white screen of death
If you’re still not sure how to fix the issues in your log file, you might want to hire a WordPress developer to do it for you – here are some tips to find the right developer.
Do you have any questions about how to set up a WordPress error log?
Even looking at bits of code feels intimidating for the average WordPress user.
The good news is that setting up a WordPress error log only takes two small snippets of code.
If you have trouble activating your WordPress error log, or questions on how to fix them, let us know in the comments below!


Or start the conversation in our Facebook group for WordPress professionals. Find answers, share tips, and get help from other WordPress experts. Join now (it’s free)!