Creating a sales funnel in WordPress is an essential marketing technique for any eCommerce business. If you haven’t done so, you could be missing out on potential customers. However, accomplishing this in WordPress involves designing several key pages and anticipating shopper behavior, which can be difficult if you’re new to this strategy.
Fortunately, you don’t need any coding skills to build an irresistible sales funnel that nurtures leads into repeat customers. If you already have a WordPress website, all you need is a few plugins, a well-thought-out customer journey, and, of course, your product.
This article will explain what a sales funnel is and how to make one on your WordPress site. Let’s get to it!
📚 Table of contents:
Understanding sales funnels and why you might need one
In essence, a sales funnel is the customer’s journey from the initial contact with your brand through their eventual purchase. Its primary goal is to convert your leads into buyers, which you can do by encouraging them to complete a series of predefined steps.
The exact steps of your sales funnel may vary slightly depending on what you’re selling. However, you can basically boil it down to four stages:
- Awareness. First, a lead needs to be made aware of your brand. They might find your product through a Google search, discover it in a social media ad, or any other number of marketing channels.
- Interest. If the lead is interested in your offer, they progress to the next stage of the funnel. Here’s where they learning more about your specific product or service and their purchasing options.
- Decision. At a certain point, the lead will determine if they want to buy your product or service. Ideally, they will add it to their virtual cart and proceed to checkout.
- Action. The lead completes the checkout process, converting into a paying customer.
To facilitate a lead’s movement through these stages, you might set up landing pages, improve the user experience (UX) of your Checkout page, and more. By proactively taking steps to nurture leads instead of simply leaving them to their own devices and hoping for the best, you can increase your conversions, revenue, and even brand loyalty.
What you will need to set up a sales funnel in WordPress
To set up an effective sales funnel in WordPress, you’ll need:
- Fast web hosting. If you’re building an online store, it’s smart to host your site with an eCommerce friendly provider that can handle sudden traffic spikes.
- A lightweight theme. Speed is crucial to driving conversions. If your pages take too long to load, your potential customers might abandon them. Therefore, opt for a fast WordPress theme such as Neve.
- A marketing strategy. In order to generate brand awareness and draw leads into your sales funnel, you need a solid marketing strategy. This may incorporate pay-per-click ads, email campaigns, social media, a blog, or any number of other techniques.
- Ecommerce plugins. Finally, to build a sales funnel, you’ll need to add key eCommerce functionality to your site with a plugin such as WooCommerce. It’s also best to install a sales funnel plugin such as CartFlows to help you make fast progress.
You might also want to use a page builder plugin such as Elementor to design high-converting pages. However, you can build an effective funnel using just the Block Editor if you prefer.
How to make a sales funnel in WordPress (in five steps)
Now that we’ve discussed the importance of having a sales funnel for your eCommerce site, let’s go over how to make one with WooCommerce and CartFlows. The steps below should be adaptable to any eCommerce site, so don’t hesitate to tweak them to better fit your particular shop and products.
Step 1: Install key plugins and add your products
If you haven’t already, install and activate WooCommerce. Follow the steps in the setup wizard to add your online store details, shipping options, and payment gateways:

Once you’ve completed the setup, go to Products > Add New and enter the details of the item you’d like to include in your sales funnel. Repeat this step for any other products you wish to sell, too:

If you need more help with the initial steps of creating your eCommerce site, check out our full WooCommerce tutorial.
Once your online store is up and running, install and activate CartFlows. It also provides a setup wizard:

If you’re planning to use a page builder, select it from the dropdown menu at the relevant stage. Alternatively, you can select Gutenberg to stick with the Block Editor.
Step 2: Design a landing page
Next, you’ll need a landing page for your product. This is a type of content designed to convert visitors who arrive on your site during the ‘interest’ stage of the sales funnel. They’ve likely encountered one of your marketing campaigns and are now seeking more information.
To create yours, go to CartFlows > Flows > Add New. You’ll be able to select from the available funnel templates, which you can customize later:

CartFlows will only display templates (called ‘flows’) that are compatible with the page builder you chose when setting up the plugin. Select one you like, then click on Import to go to the flow editing screen:

Note that for this example, we’ve selected a template that includes a landing page, a Checkout page, and a Thank You page. If your template doesn’t include one or more of these pages, you can click on Add New Step at any time to create it from scratch.
For now, we’re going to customize our template’s landing page using the standard Block Editor. Click on Edit to open the page editor:

Here, you’ll be able to move, add, or delete elements and replace text and images using whichever page builder you selected in the CartFlows setup wizard. Make sure to include a clear value proposition and an effective call to action (CTA). Don’t forget to save your changes.
Step 3: Create your Checkout and Thank You pages
Next, go back to your Flows screen and repeat the process in Step 2 for your Checkout and Thank You pages (or any other content included in your template). This is fairly straightforward, but there is one unique step you need to complete for your Checkout page.
In the flow editor, you might notice that there’s a label on your Checkout page that reads No Product Assigned:
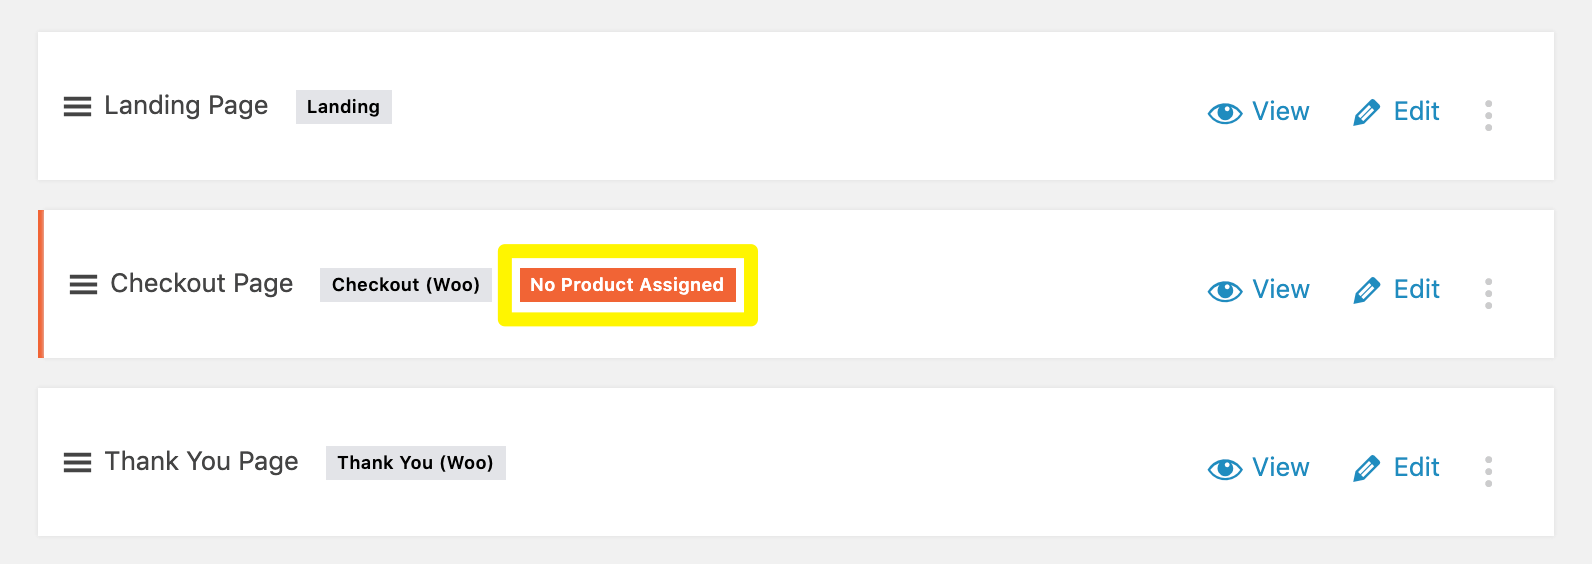
If you click on Edit and scroll down, you’ll see a section labeled Checkout Settings where you can link a specific product to this page:

CartFlows provides detailed documentation that takes you through each option here in more detail.
The purpose of your Thank You page is to give customers confirmation that they’ve completed their purchases and to make them feel valued to build brand loyalty. You may also wish to include another CTA directing buyers to any next steps, such as your upsell page or social media profiles.
Step 4: Add upsell pages (optional)
At this stage, you might consider your sales funnel complete. However, repeat customers are highly valuable to your business. For this reason, you may want to direct buyers to an upsell page to start fostering a lasting relationship (and future sales) with them while they’re already on your site.
For instance, if your lead just signed up for a ‘Marketing 101’ webinar, you might offer them an eBook called ‘Introduction to Marketing’ at a special discount:

If you upgrade to the premium version of CartFlows, you’ll have access to templates that include upsell pages. Otherwise, you can always click on Add New Step from the flow editor to build your own from scratch.
Step 5: Direct leads to your sales funnel in WordPress
Finally, you’ll be able to connect the dots and link the pages you’ve just created. By default, CartFlows will direct users through your site in the order specified in the flow editor.
For instance, the example we’ve used throughout this tutorial starts with a landing page, followed by the Checkout and Thank You pages. If you want to add extra steps, you can do so via the Add New Step button and rearrange the order from the flow editor as you wish.
Your sales funnel is already published, so all you have to do is start directing traffic to your landing page via your marketing channels. Those who are interested in the product you assigned to this flow will automatically be sent to your custom Checkout and Thank You pages as they click on your CTAs and complete their purchases.
Conclusion
A sales funnel can be an excellent way to boost conversions. Whether you sell physical products or not, it’s a must-have strategy for any online business. Fortunately, you can easily set one up with CartFlows.
In this article, we’ve shown you how to make a sales funnel in WordPress in five steps:
- Install WooCommerce and CartFlows.
- Design a compelling landing page.
- Create Checkout and Thank You pages.
- Add an optional upsell page to start nurturing repeat customers.
- Direct leads to your landing page to start guiding them through your sales funnel.
Do you have any questions about making a sales funnel in WordPress? Let us know in the comments section below!











Or start the conversation in our Facebook group for WordPress professionals. Find answers, share tips, and get help from other WordPress experts. Join now (it’s free)!